天阔阔雪漫漫共谁同航 这沙滚滚水皱皱笑着浪荡

React prologue and Build a note app

|

Tutorial video in Youtube by Bucky Roberts

  1. Download code:  https://github.com/buckyroberts/React-Boilerplate, My editon with notes: https://github.com/xy7313/React-Boilerplate. Final note app click here, application code here

  2. Include JSX
    //after download, also can ref online file,
    <script src="../../js/react.min.js"></script>
    <script src="../../js/react-dom.min.js"></script>
    <script src="../../js/browser.min.js"></script>
    

    The last line transpile jsx file to plain js file so that browser can understand jsx. There are also some online tools can do the same work for developer.

    • an example:
     <!DOCTYPE html>
     <html>
    
       <head>
         <script data-require="react@*" data-semver="15.5.0" src="https://cdnjs.cloudflare.com/ajax/libs/react/15.5.0/react.min.js"></script>
         <script data-require="react@*" data-semver="15.5.0" src="https://cdnjs.cloudflare.com/ajax/libs/react/15.5.0/react-dom.min.js"></script>
         <script data-require="react@*" data-semver="15.5.0" src="    https://cdnjs.cloudflare.com/ajax/libs/babel-core/5.8.24/browser.min.js"></script>
         <link rel="stylesheet" href="style.css" />
       </head>
    
       <body>
    
         <div id="container"></div>
    
         <script type="text/babel">
             ReactDOM.render(
                 <h2>Welcome to React!</h2>,
                 document.getElementById('container')
             );
         </script>
    
       <script src="script.js"></script>
       </body>
    
     </html>
    
  3. Include bable: we add a h2 tag into the html element whoes id is ‘container’
     <script type="text/babel">
         ReactDOM.render(
             <h2>Welcome to React!</h2>,
             document.getElementById('container')
         );
    </script>
    
  4. Components: parts of your website, entire application is made up of components.

  5. Super component:
    <script type="text/babel">
     var BuckysComponent = React.createClass({
         //object
            //return html
         render: function() {
             return (<h2>This is a simple component</h2>);
         }
     });
     ReactDOM.render(<BuckysComponent />, document.getElementById('container'));
    </script>
    
  6. Mutiple components
    • One component can only return one parent element(div). The render ReactDOM.render(..,..)can only render only one one parent tag
    • when we want to return more than one html tags.
       <script type="text/babel">
       var BuckysComponent = React.createClass({
        //object
        //return html
        render: function() {
            return (
               <div>
                   <h2>This is a simple component</h2>
                   <p>para</p>
               </div>
           );   
        }
       });
       ReactDOM.render(<div>
                     <BuckysComponent />
                     <BuckysComponent />
                 </div>, document.getElementById('container'));
      </script>
      
  7. Properties:
    • make template for one component and customize in different ways. Using curly brace{}
    • Property is essentially an HTML attribute that we can pass in to customize our components in different kinds of ways.
    <body>
    
       <div id="container"></div>
    
       <script type="text/babel">
         var Movie = React.createClass({ 
           render:function(){
             return(
                     <div>
                       <h1>{this.props.title}</h1>
                       <h2>{this.props.genre}</h2>
                     </div>
               );
           }
         });
           ReactDOM.render(
             <div>
               <Movie title="Avatar" genre="action"/>
               <Movie title="The NoteBook" genre="romance"/>
               <Movie title="Cube" genre="thriller"/>
             </div>,document.getElementById('container')
           );
       </script>
    
     </body>
    //output: Avatar, action, The NoteBook, romance, Cube, thriller
    
  8. Event handling
    • Example: Built a sticky note app, where users can add new notes, delete or edit notes and write any notes.
    • can not use class as prop’s name, because class is one of the reserve words in js
    • children property(built-in prop), between the opening tag and closing tag, like: ` hey-sample txt`
    <!DOCTYPE html>
    <html>
    
     <head>
        <meta charset="utf-8">
        <meta name="viewport" content="width=device-width, initial-scale=1">
        <title>React-stickyNote</title>
        <script src="../../js/react.min.js"></script>
        <script src="../../js/react-dom.min.js"></script>
        <script src="../../js/browser.min.js"></script>
        <link rel = "stylesheet" type="text/css" href = "../../css/main.css">
      </head>
    
      <body>
    
        <div id="container"></div>
    
        <script type="text/babel">
          var Comment = React.createClass({ 
            edit: function(){
              alert("edit");
            },
            remove: function(){
              alert("remove");
            },
            render: function(){
              return(
                 <div className = "commentContainer">
                   <div className = "commentText"> {this.props.children} </div>
                   <button  onClick={this.edit} className = "button-primary">Edit</button>
                   <button onClick={this.remove} className = "button-danger" >Remove</button>
                 </div>
                );
            }
          });
            ReactDOM.render(
              <div className = "board">
                <Comment>hey-sample txt</Comment>
                <Comment>beans</Comment>
                <Comment>TUNA txt</Comment>
              </div>,document.getElementById('container')
            );
        </script>
    
      </body>
    
    </html>
    
  9. State
    • Customize the components using properties and states. Whenever something is gonna stay the same uses properties, whenever changes uses states.
    • You don’t need to explicitly say whenever your state changes to redraw a certain part of your webpage, it automatically watches for your states. Whenever their state changes, the part of web page gets redrawn automatically to fit that.
     <script type="text/babel">
    
       var CheckBox = React.createClass({ 
    
         getInitialState: function(){
             return {checked:true}
         },
         handleChecked: function(){
             this.setState({checked:!this.state.checked})
         },
         render: function(){
             var msg;
             if(this.state.checked){
                 msg='checked'
             }else{
                 msg='unchecked'
             }
    
             return(
                 <div className = "commentContainer">
                   <input type = "checkbox" defaultChecked={this.state.checked} onChange = {this.handleChecked}/>
                   <h3>checkBox is {msg}</h3> 
                 </div>
               );
         }
       });
         ReactDOM.render(
           <CheckBox />,document.getElementById('container')
         );
     </script>
    
  10. Add state to component(contd on the sticky note app)
    • Requirements: This note switches bewteen two modes/states: editing, normal. That is, whenever we click edit, the text area can be changed to a form for editing. After complish editing, the form turns to text area.
    <script type="text/babel">
      var Comment = React.createClass({ 
        getInitialState: function(){
          return {editing: false}
        },
        edit: function(){
          this.setState({editing:true});
        },
        save: function(){
          this.setState({editing:false});
        },
        remove: function(){
          alert("remove");
        },
    
        renderForm: function(){
          return(
              <div className = "commentContainer">
              <textarea defaultValue = {this.props.children}></textarea>
                <button onClick={this.save} className = "button-success" >Save</button>
              </div>
            );
        },
        renderNormal: function(){
          return(
              <div className = "commentContainer">
                <div className = "commentText"> {this.props.children} </div>
                <button  onClick={this.edit} className = "button-primary">Edit</button>
                <button onClick={this.remove} className = "button-danger" >Remove</button>
              </div>
            );
        },
        render: function(){
          if(this.state.editing){
            return this.renderForm();
          }else{
            return this.renderNormal();
          }
        }
      });
        ReactDOM.render(
          <div className = "board">
            <Comment>hey-sample txt</Comment>
            <Comment>beans</Comment>
            <Comment>TUNA txt</Comment>
          </div>,document.getElementById('container')
        );
    </script>
    
  11. Refs (contd on the sticky note app)
    • Requirements: Save whatever the textarer looks like now.
    • First, get the text just typed
    • Second, show it
    • eg: var val = this.refs.newText.value; + <textarea ref = "newText" defaultValue = {this.props.children}></textarea>
  12. Rearrange multiple independent components – set up a ‘parent’ container (contd on the sticky note app)
    • In the note example, we define a borad, which is like a magener of all note components
    • unique identifier, key is the way to uniquely identify each child by giving an ID
       //add Board in script babel, change ReactDom.render
       var Board = React.createClass({
       getInitialState: function(){
         return {
           comments:[
                   'I like bacon',
                   'want some ice cream',
                   'done here'
      
           ]
         };
       },
       render: function(){
         return (
            <div className = "board">
             {
                    //anonymous  function, a.k.a a function with no name, key-unique identifier
                      this.state.comments.map(function(text,i){
                 return (<Comment key = {i}>{text}</Comment>);
               })
             }
           </div>
         );
       }
        });
      
       ReactDOM.render(<Board/> ,document.getElementById('container')
       );
      
  13. Updating state and remove notes(contd on the sticky note app)
    • clean up the render function
    • array.splice(index,num); remove num elements from index of array
        //all in var Board
        removeComment: function(i){
        console.log("remove:"+i);
        var arr = this.state.comments;
        arr.splice(i,1);
        this.setState({comments:arr});
      },
      updateComment: function(newText,i){
        console.log("new text:"+newText);
        var arr = this.state.comments;
        arr[i] = newText;
        this.setState({comments:arr});
      },
      eachComment: function(text,i){
        // unique identifier, i: increment for the array
        return (<Comment key = {i} index = {i}>
               {text}
             </Comment>);
      },
      render: function(){
        return (
         <div className = "board">
         {this.state.comments.map(this.eachComment)}
       </div>
        );
      }


  14. Passing functions as props (contd on the sticky note app)
    • how to call functions from entirely different components? using props
  15. Add new component (contd on the sticky note app)

  16. Js can not figure out the scope, so we need to call band : <button className = "button-info create" onClick = {this.addComment.bind(null,'Type here')}>New A Comment</button>. Notice that: Don’t .bind in the render() function - that creates a new function every time render is called (which will be often.) .bind in the component constructor. We will create too many comment components and get an error.

An advantage of react

  1. Never think about re-rendering!

The benefit of this separation of concerns is you don’t have to concern yourself with whether something has been rendered before, or whether it’s the first time. Since React rendering is immutable, the first render and the 100th render of the same component are handled the exact same way. When state changes, Redux only re-renders relevant components on the page.

The reason React is much more successful in this regard is because it applies changes to a ‘Virtual DOM’ and creates a diff of the smallest change set possible, which it then applies to the DOM. Since updating the DOM is the lengthiest part of the render process, this massive reduction in DOM updates greatly improves performance. It means you really can forget about the rendering process, which has never been true before in front-end.
Get start with Angular2 - products management

|

TypeScript

  1. Open source language

  2. Strongly type

    • TypeScript type definition files (libraryname.d.tx)
  3. Transpiles to plain javascript

  4. Class-based, Object-oriented

npm

  1. Node Package Manager for JavaScript

  2. is a command line utility that interacts with repositories of open source projects

Manually setup Angular2 application

  1. Create an application folder

  2. tsconfig.json

  3. package.json

  4. typings.json

  5. Install libraries and typings

  6. index.html (entrypoint of application)

  7. main.tx(bootstrapper) file to bootstrap the angular application with the root component

Using Angular tool cli to setup Angular2 application(Prefer)

  1. Make sure you have installed node.js

  2. install cli following this instruction https://github.com/angular/angular-cli

  3. Navigate to http://localhost:4200/

  4. angular-cli.json all configuration –> index.html, main.ts, app.module.ts, app.component.ts, (import)

Products Example

  1. Architecture: index.html is comprised of

    • App components:

      • welcome component,

      • product component

        • star component
      • product detail component

    • Product data service

  2. Outline:

    • Components, life cycle

    • Template, Interpolation, Directives for user interface

    • data binding, pipes

    • nested components and communication between container and nested component

    • service and dependency injection(inject services into component)

    • Retrieving data using http, communicate with back-end server

    • Setup routing to navigate between user views

Angular Basic

  1. Components make applications, component = template+class(including props, methods)+metadata

  2. Modules: Help code organization, resolve namespaces issues

  3. ES2015 file is a module, module is a file. Angular2 uses ES2015 modules

  4. Modules in ES2015.

    • We have code export class Product{...} in product.ts file, this export keyword indicates that we can import this product module in any other modules

    • import classname from classpath: import { Product } from 'pathofproduct.ts'. (Notice that we import the js file, the compiled .ts file. The reason we do not need to specify the file type is because we have set the default extension for files in system.config)

  5. Common name convention in angular: name each component class with the feature name, then append the Component as suffix

  6. A class becomes an angular component when we give it component metadata.

  7. Define properties and methods in class

    • propname, colon, data type, value : pageTitle : string = "example";;

    • function name, colon, return value toggleImg() : void{...}.

    • Methods after properties

  8. Decorator:

    • Define component metadata within an angular component function, and typeScript will attach that function to the class as a decorator.

    • Using function to add metadata to a class, it’s a javascript language feature implemented using typescript.

    • Scope of decorator is limited to the feature it decorates.

    • Prefix with @ (‘at sign),

    • Angular have several built-in decorators, we can also build custom decorators

    • Define decorator above the class signature. No semicolon followed

    • Use component decorator to identify the class as a component. Since it’s a function, we add parenthesis and pass object with props.

      • selector : component’s directive name used in HTML. Directive is a custom HTML tag. Whenever this directive is in HTML, angular render this component’s template.

      • template: view layout

  9. Data binding, double curly braces,

  10. When we want to use external class and functions, we need to define where to find it using import on the top of the code file.

  11. Angular is modular: core, animate, http, router

  12. Checklist for coding component

    • Class –> code

      • Clear Name: Pascal casing; Append “component”

      • Export keyword

      • Data in props : appropriate data type and default value; camelCase with the first letter lowercase

      • Logic in methods

    • Decorator –> metadata

      • Component Decorator: prefix with @; suffix with () because it’s a function

      • Selector: Directive, component name we use directly in HTML, if we do not use this component in html, we can ignore this selector prop

      • Template

    • Import

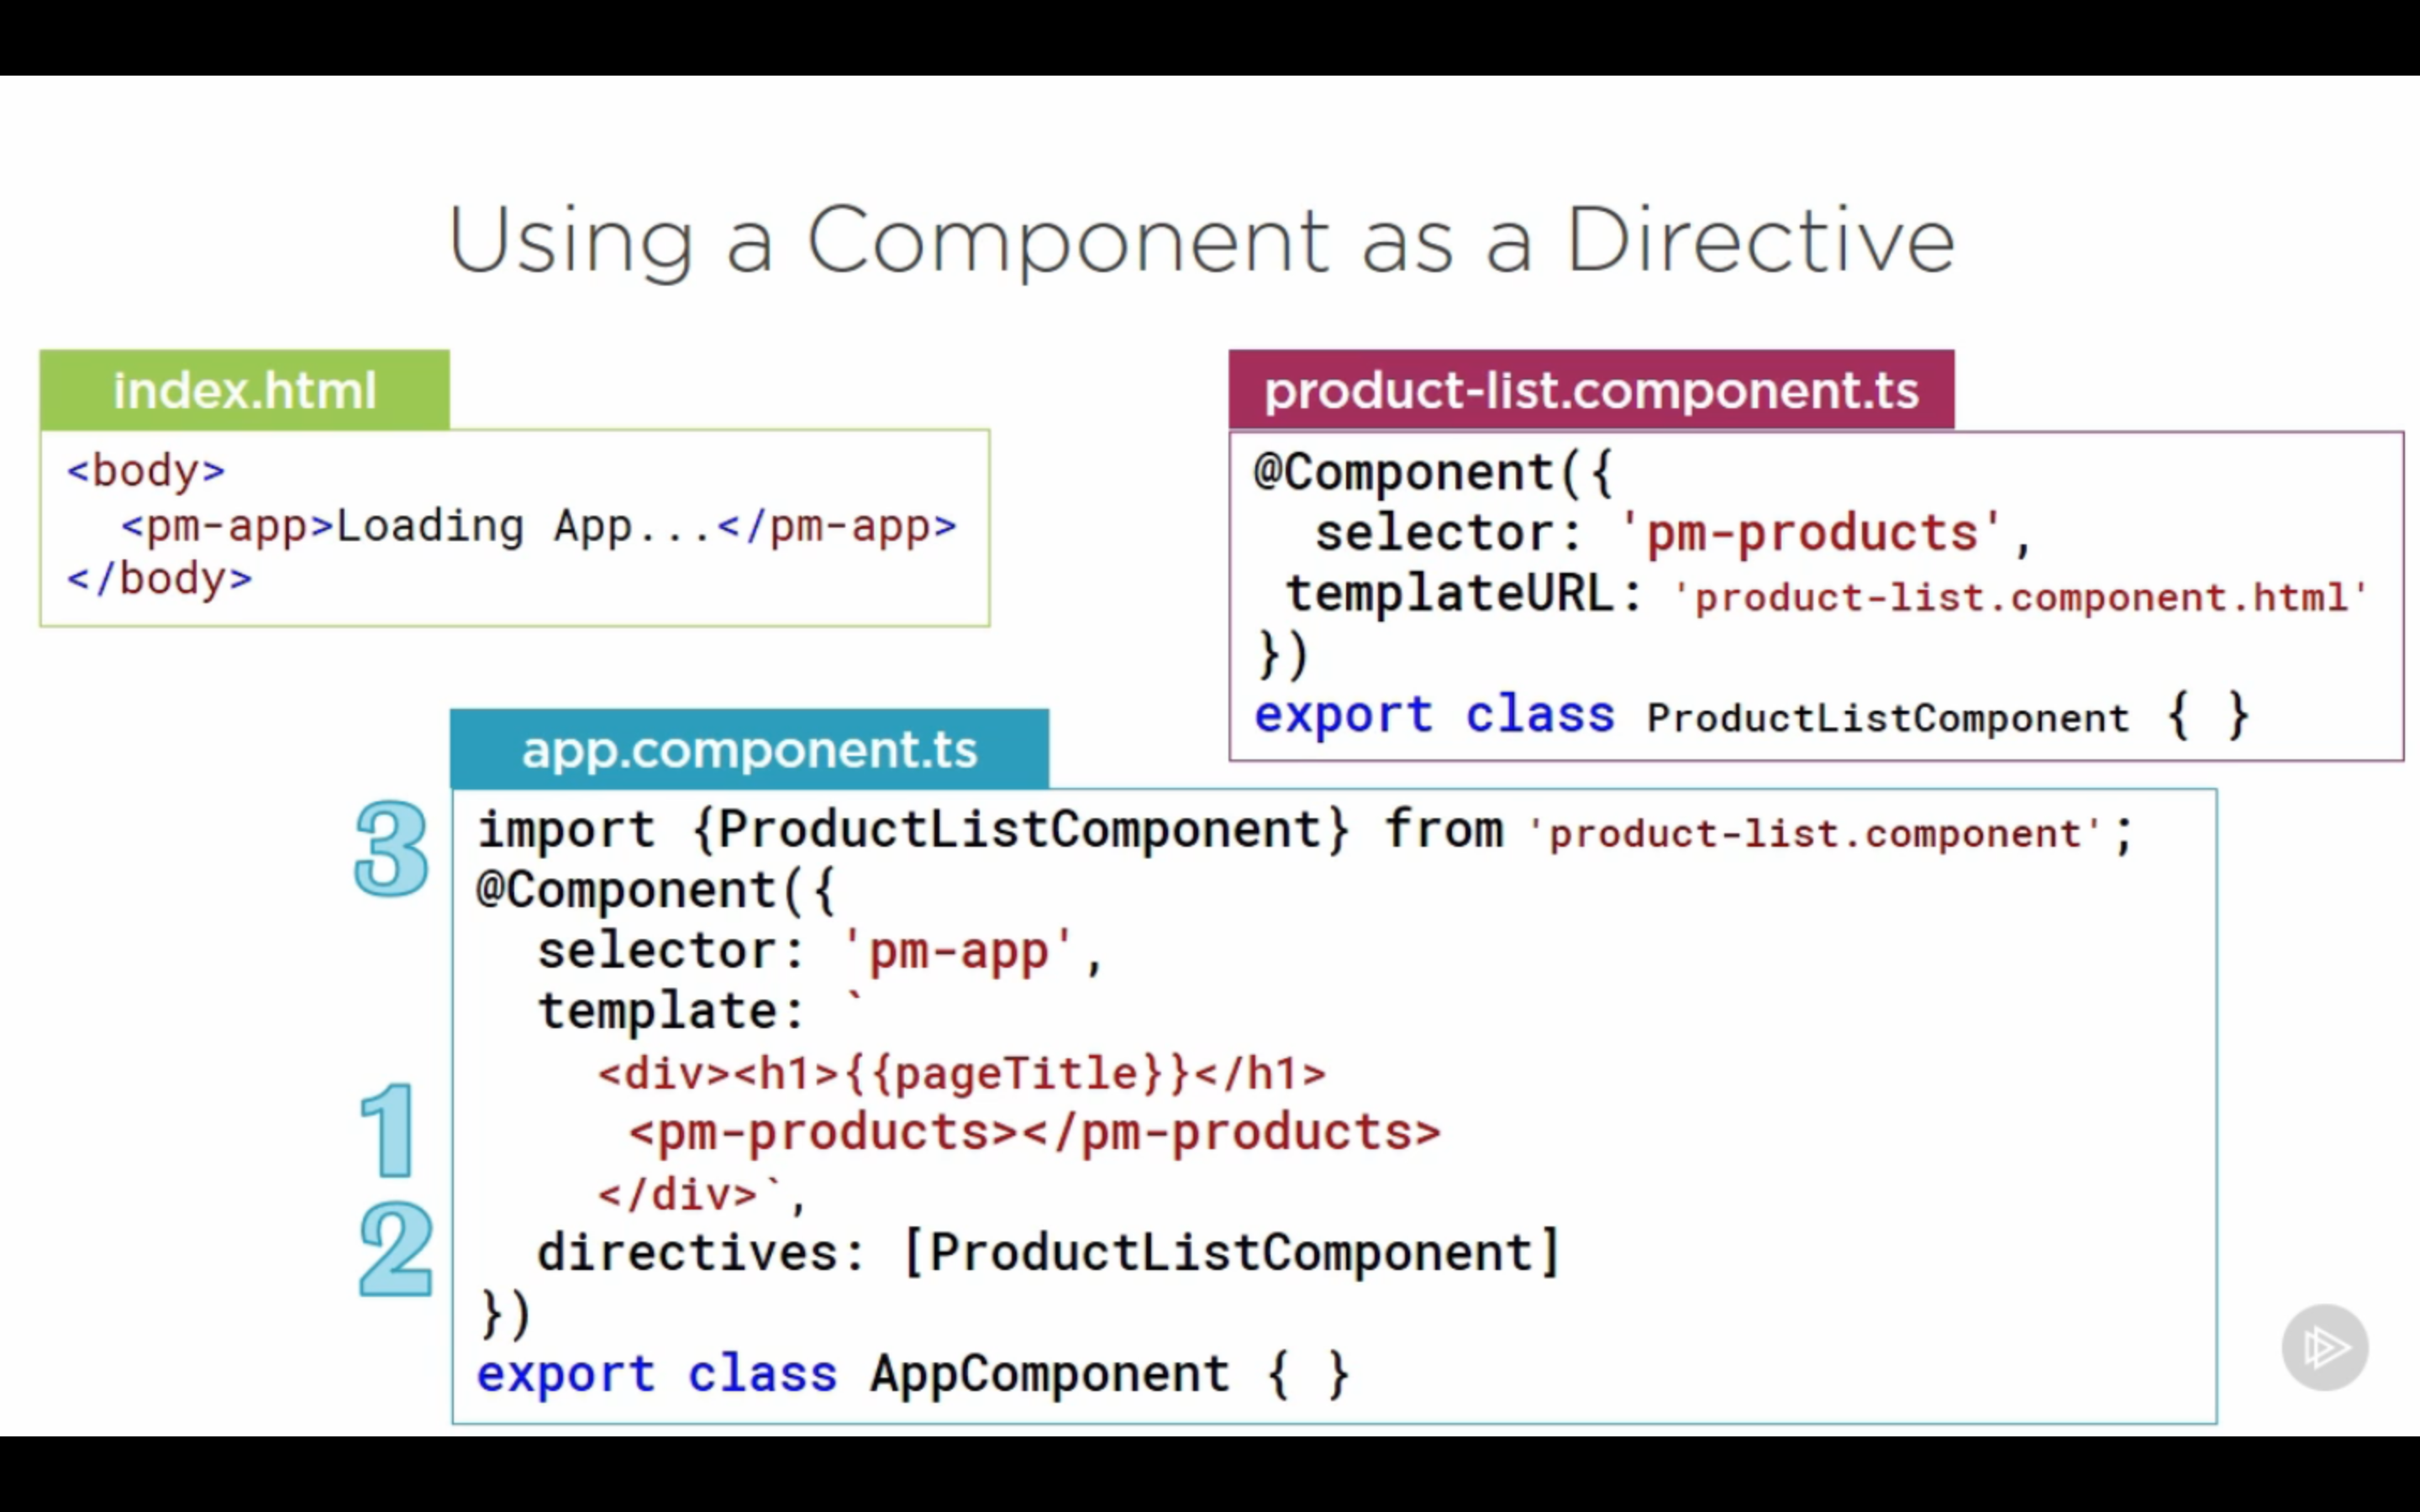
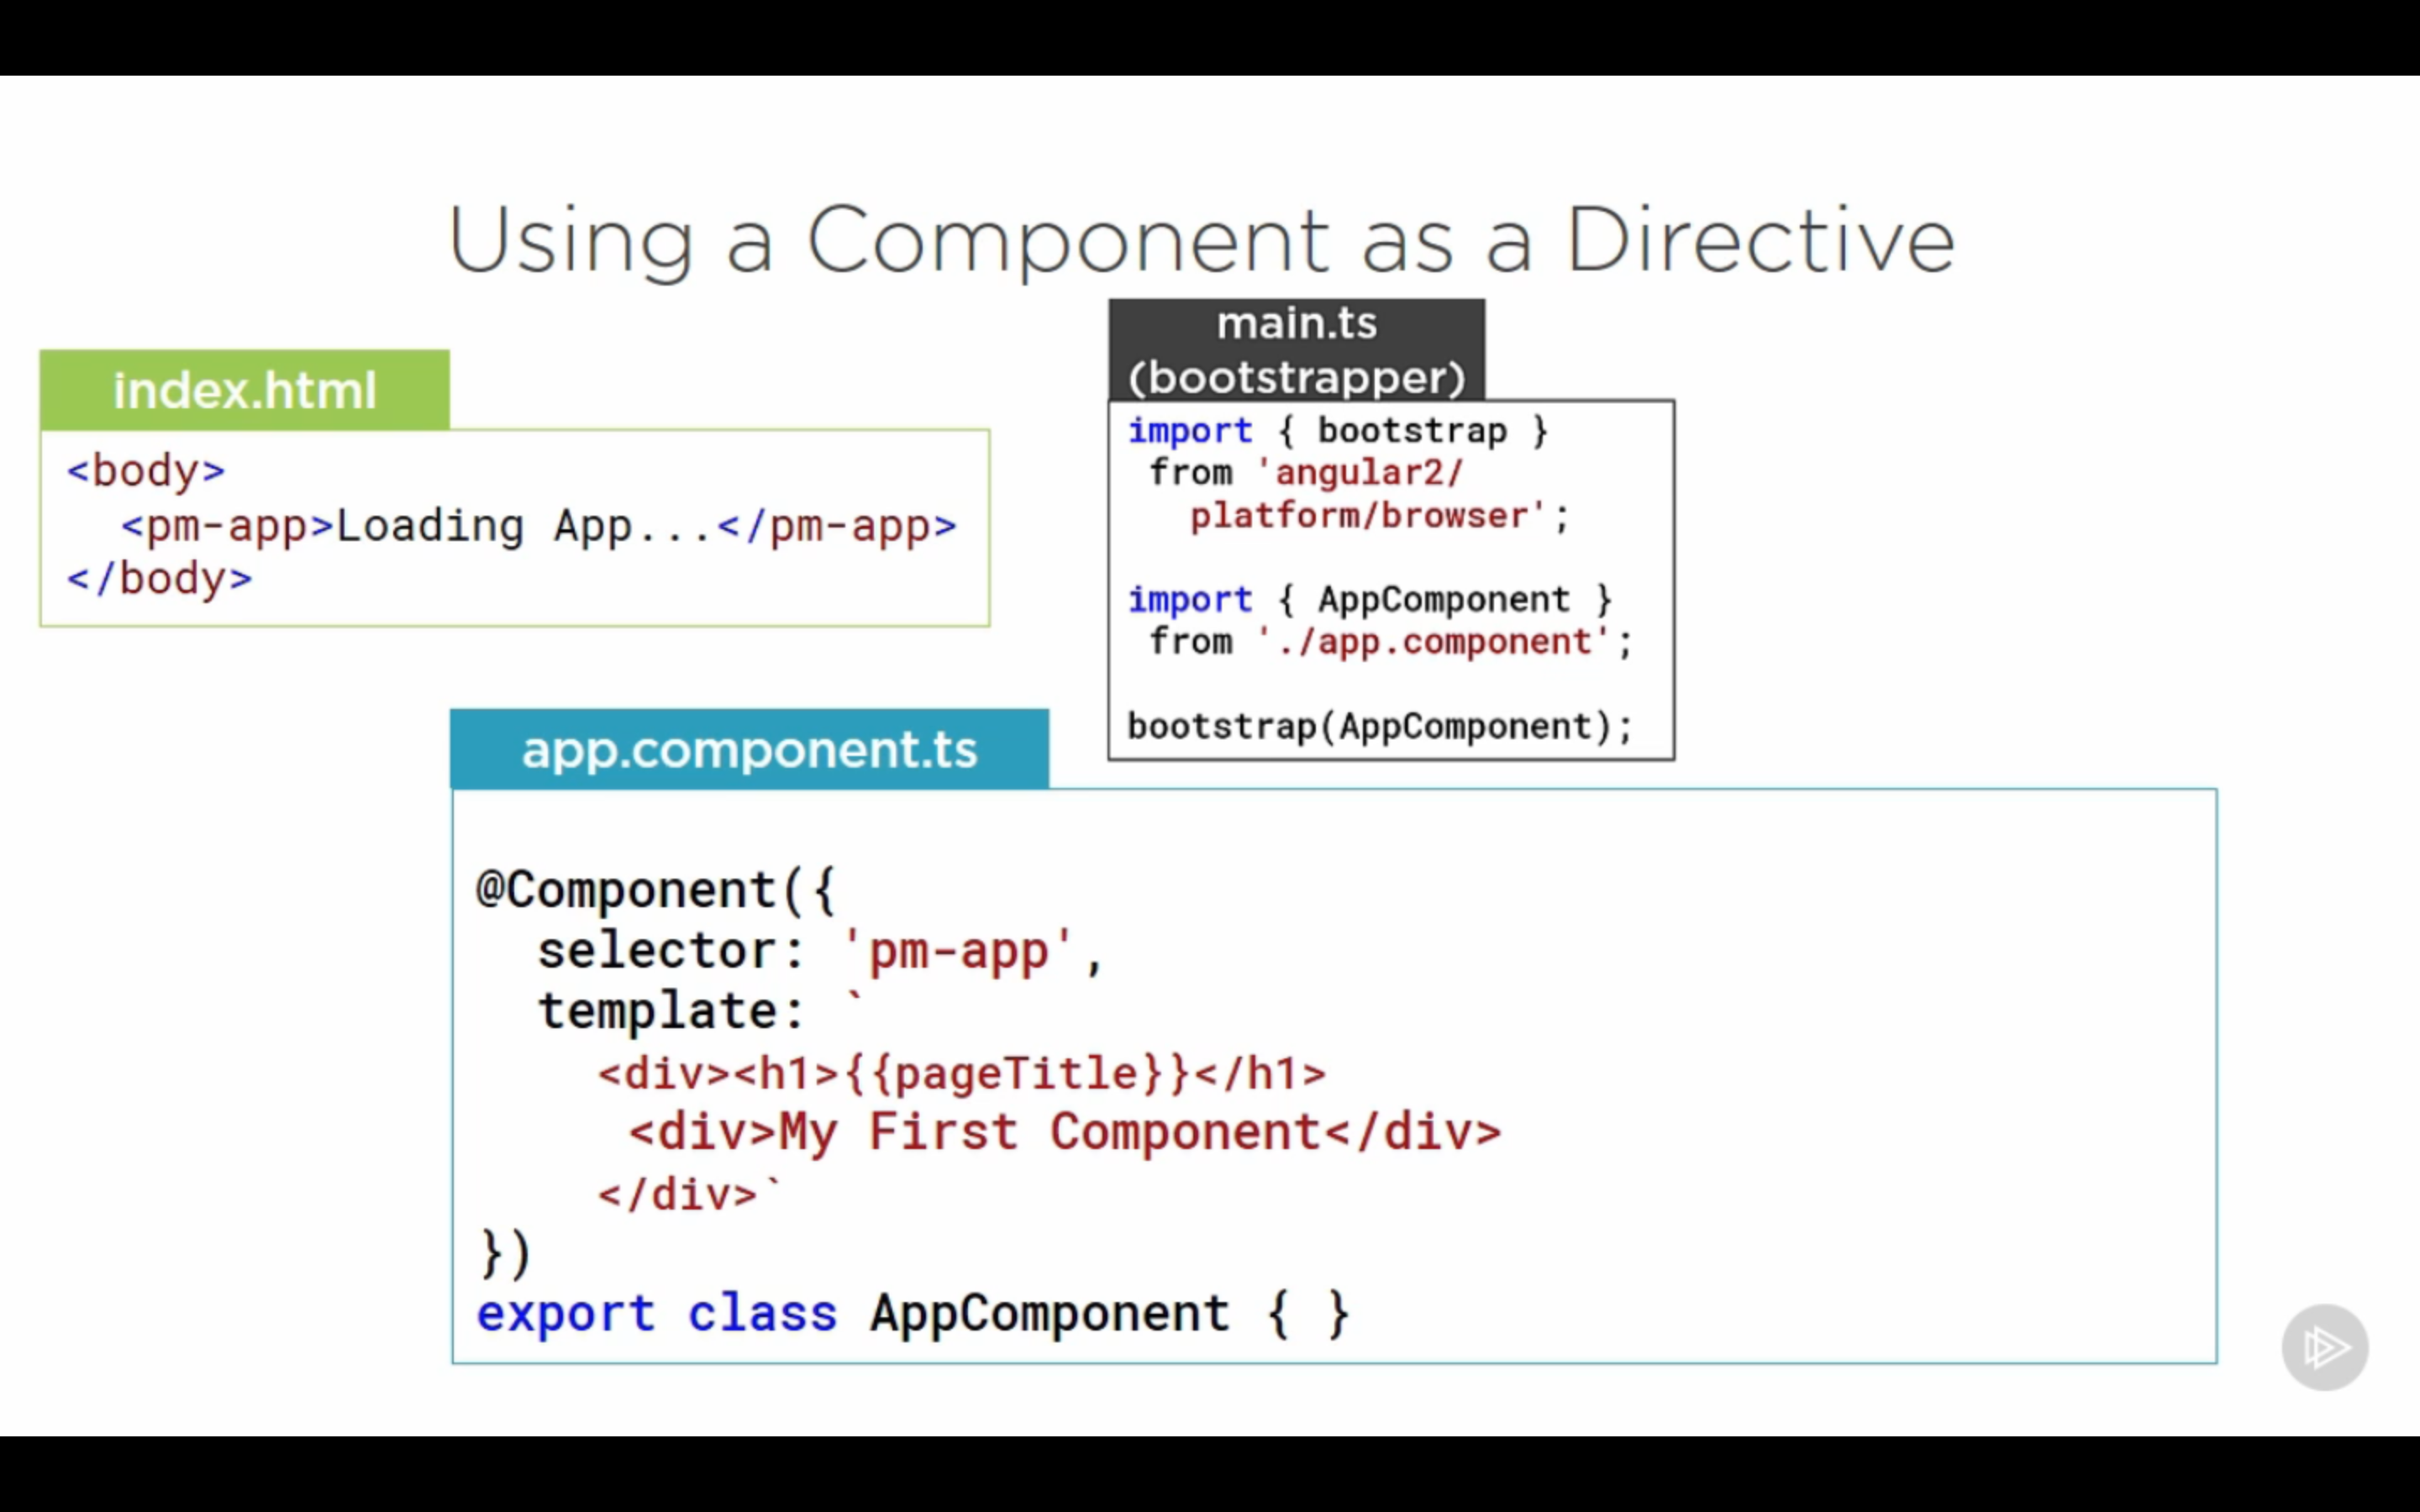
  13. Using component as directive

    using component as directive implemented by defining in main.ts container and directive 3 steps to use directive component as directive. Directive prop: classname in component. (We may have other choices later.)

  14. Directives:

    • Custom Directives

    • Angular Built-in Directives

      • Structural directives: modify the structure or layout of a view by manipulating element in their children. * marks(asterisk) the directives as structural directives

      • <table class='table' *ngIf='products && products.length'> if the right side evaluates to a false value , remove this element and its children from DOM. If products exists and length!=0, show the table

      • <tr *ngFor='let product of filteredProducts'> ` ‘#product of products’` the #(hash symbol) means it is a local variable uses only in this template. Assign to a quoted string expression

  15. any[] is the data type used when we aren’t sure about the datatype in typescript.

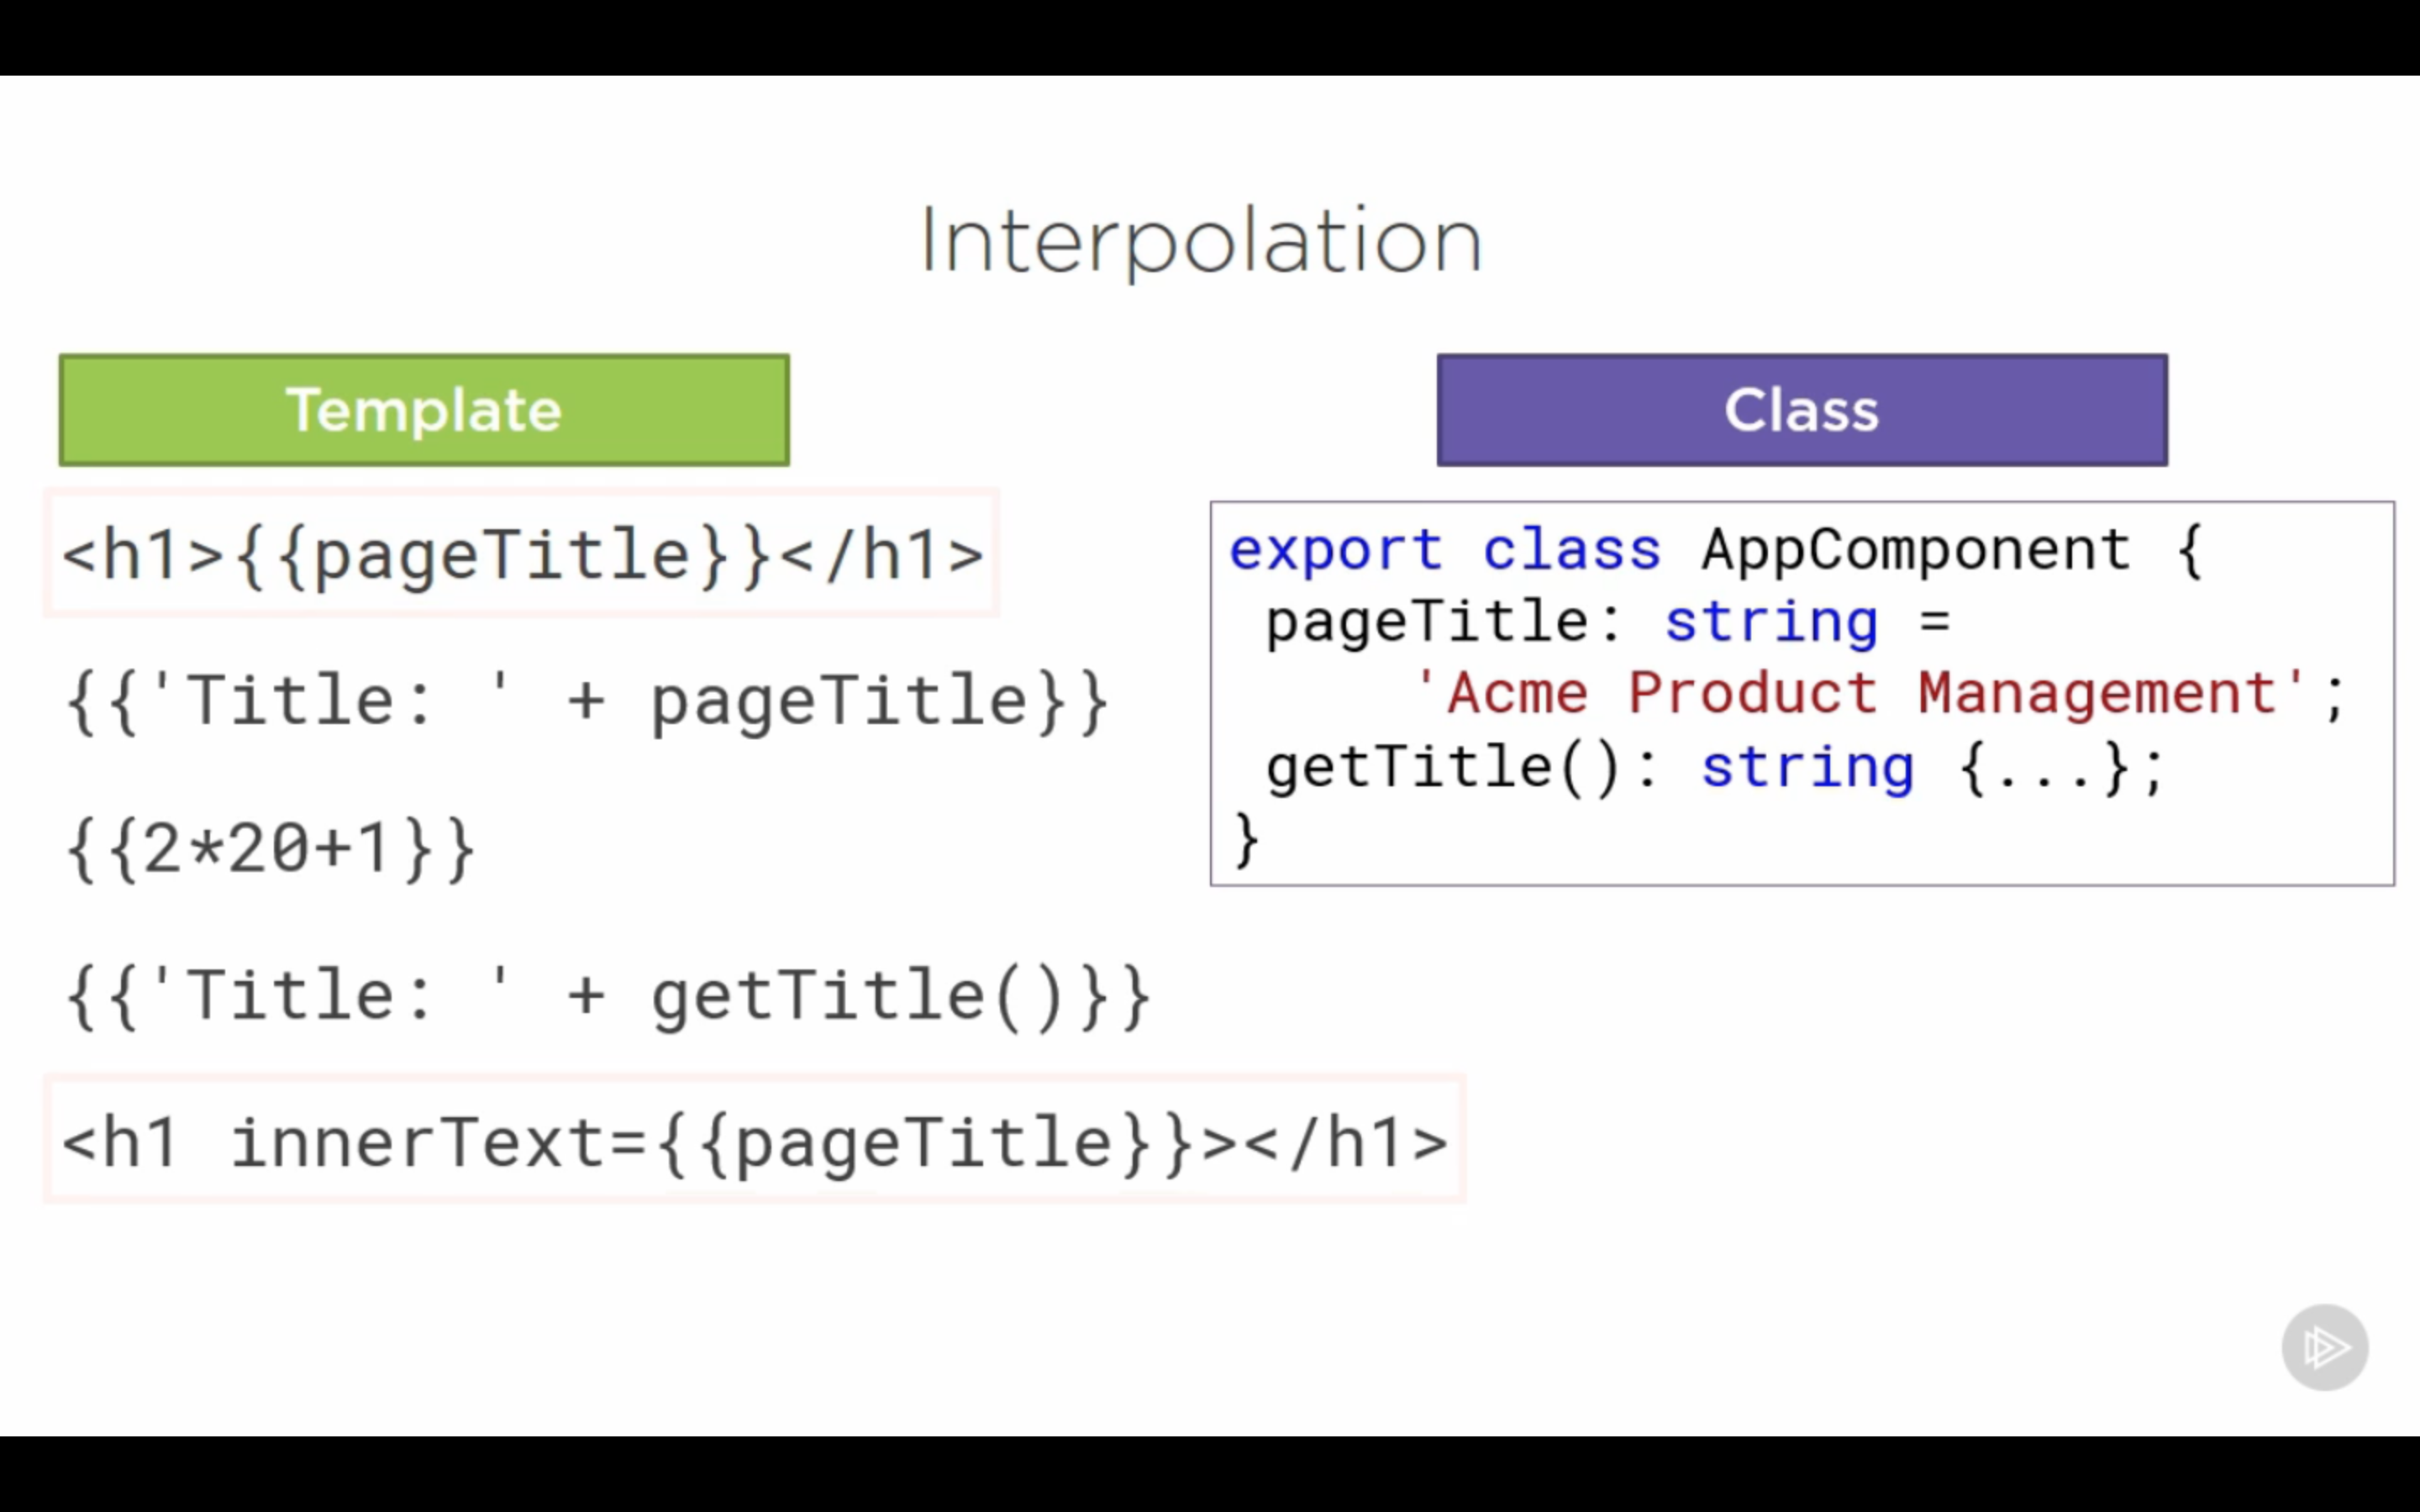
  16. Data Binding with Interpolation

     The double curly braces part is called Template Expression, angular using interpolation to pass data. It's a one way binding from the class prop to a template

  17. Property binding ( [] ): set property of an element to value of a template expression

    • Binding source are always enclosed in quotes

    • Binding targets as always enclosed in square brackets []

    • [binding target] = ‘binding source’;, eg <img [src]='product.imageUrl' [title]='product.productName' [style.width.px] = 'imageWidth' />; <img src = 'http://somewebsite/'> (binding using interpolation)

  18. Event binding ( () ): bind an event to an element

    • Target event is always enclosed in parentheses

    • Component class method will always be enclosed in quotes

    • (target event) = ‘method()’; eg: <button (click)='toggleImage()' class="btn btn-primary">Show image</button>

  19. Two way binding: component–prop–>dom, dom–events–>component.

    • Syntax [(ngModel)] = ‘property name’; []+(),prop binding + event binding, [()]-banana in the box

    • filter input element: <input type="text" [(ngModel)] = 'listFilter' /> <h3>Filtered by : </h3>

  20. Pipes: transform data, separated with colons <td></td>, ``, ` <tr *ngFor = “let product of products productFilter : filterList”>`
  21. Improving components

    1. Strong typing & Interface:

      • Create interfaces to strongly type a property, use interface as a data type.

      • Interface is a specification identifying a related set of properties and methods, a class commits to supporting the specification by implementing the interface

      • Development time only.

      • (properly cycle event, transform data to user friendly values as needed)

    2. Encapsulating styles: ensure styles do not leak out to any other components. Add ` styleUrls: [’./product-list.component.css’]` in decorator

    3. Lifecycle hooks:

      • Component have a life cycle: Create –> Render –> Create and render children –> process changes –> destroy

      • Most commonly use:

        • OnInit: initialization, retrieve data

        • OnChange: Perform actions after angular sets data binding input props

        • OnDestroy: cleanup

    4. Custom pipes: transform(value: Iproduct[], args?: string) question mark marks the parameter as optional.

    5. Nested component

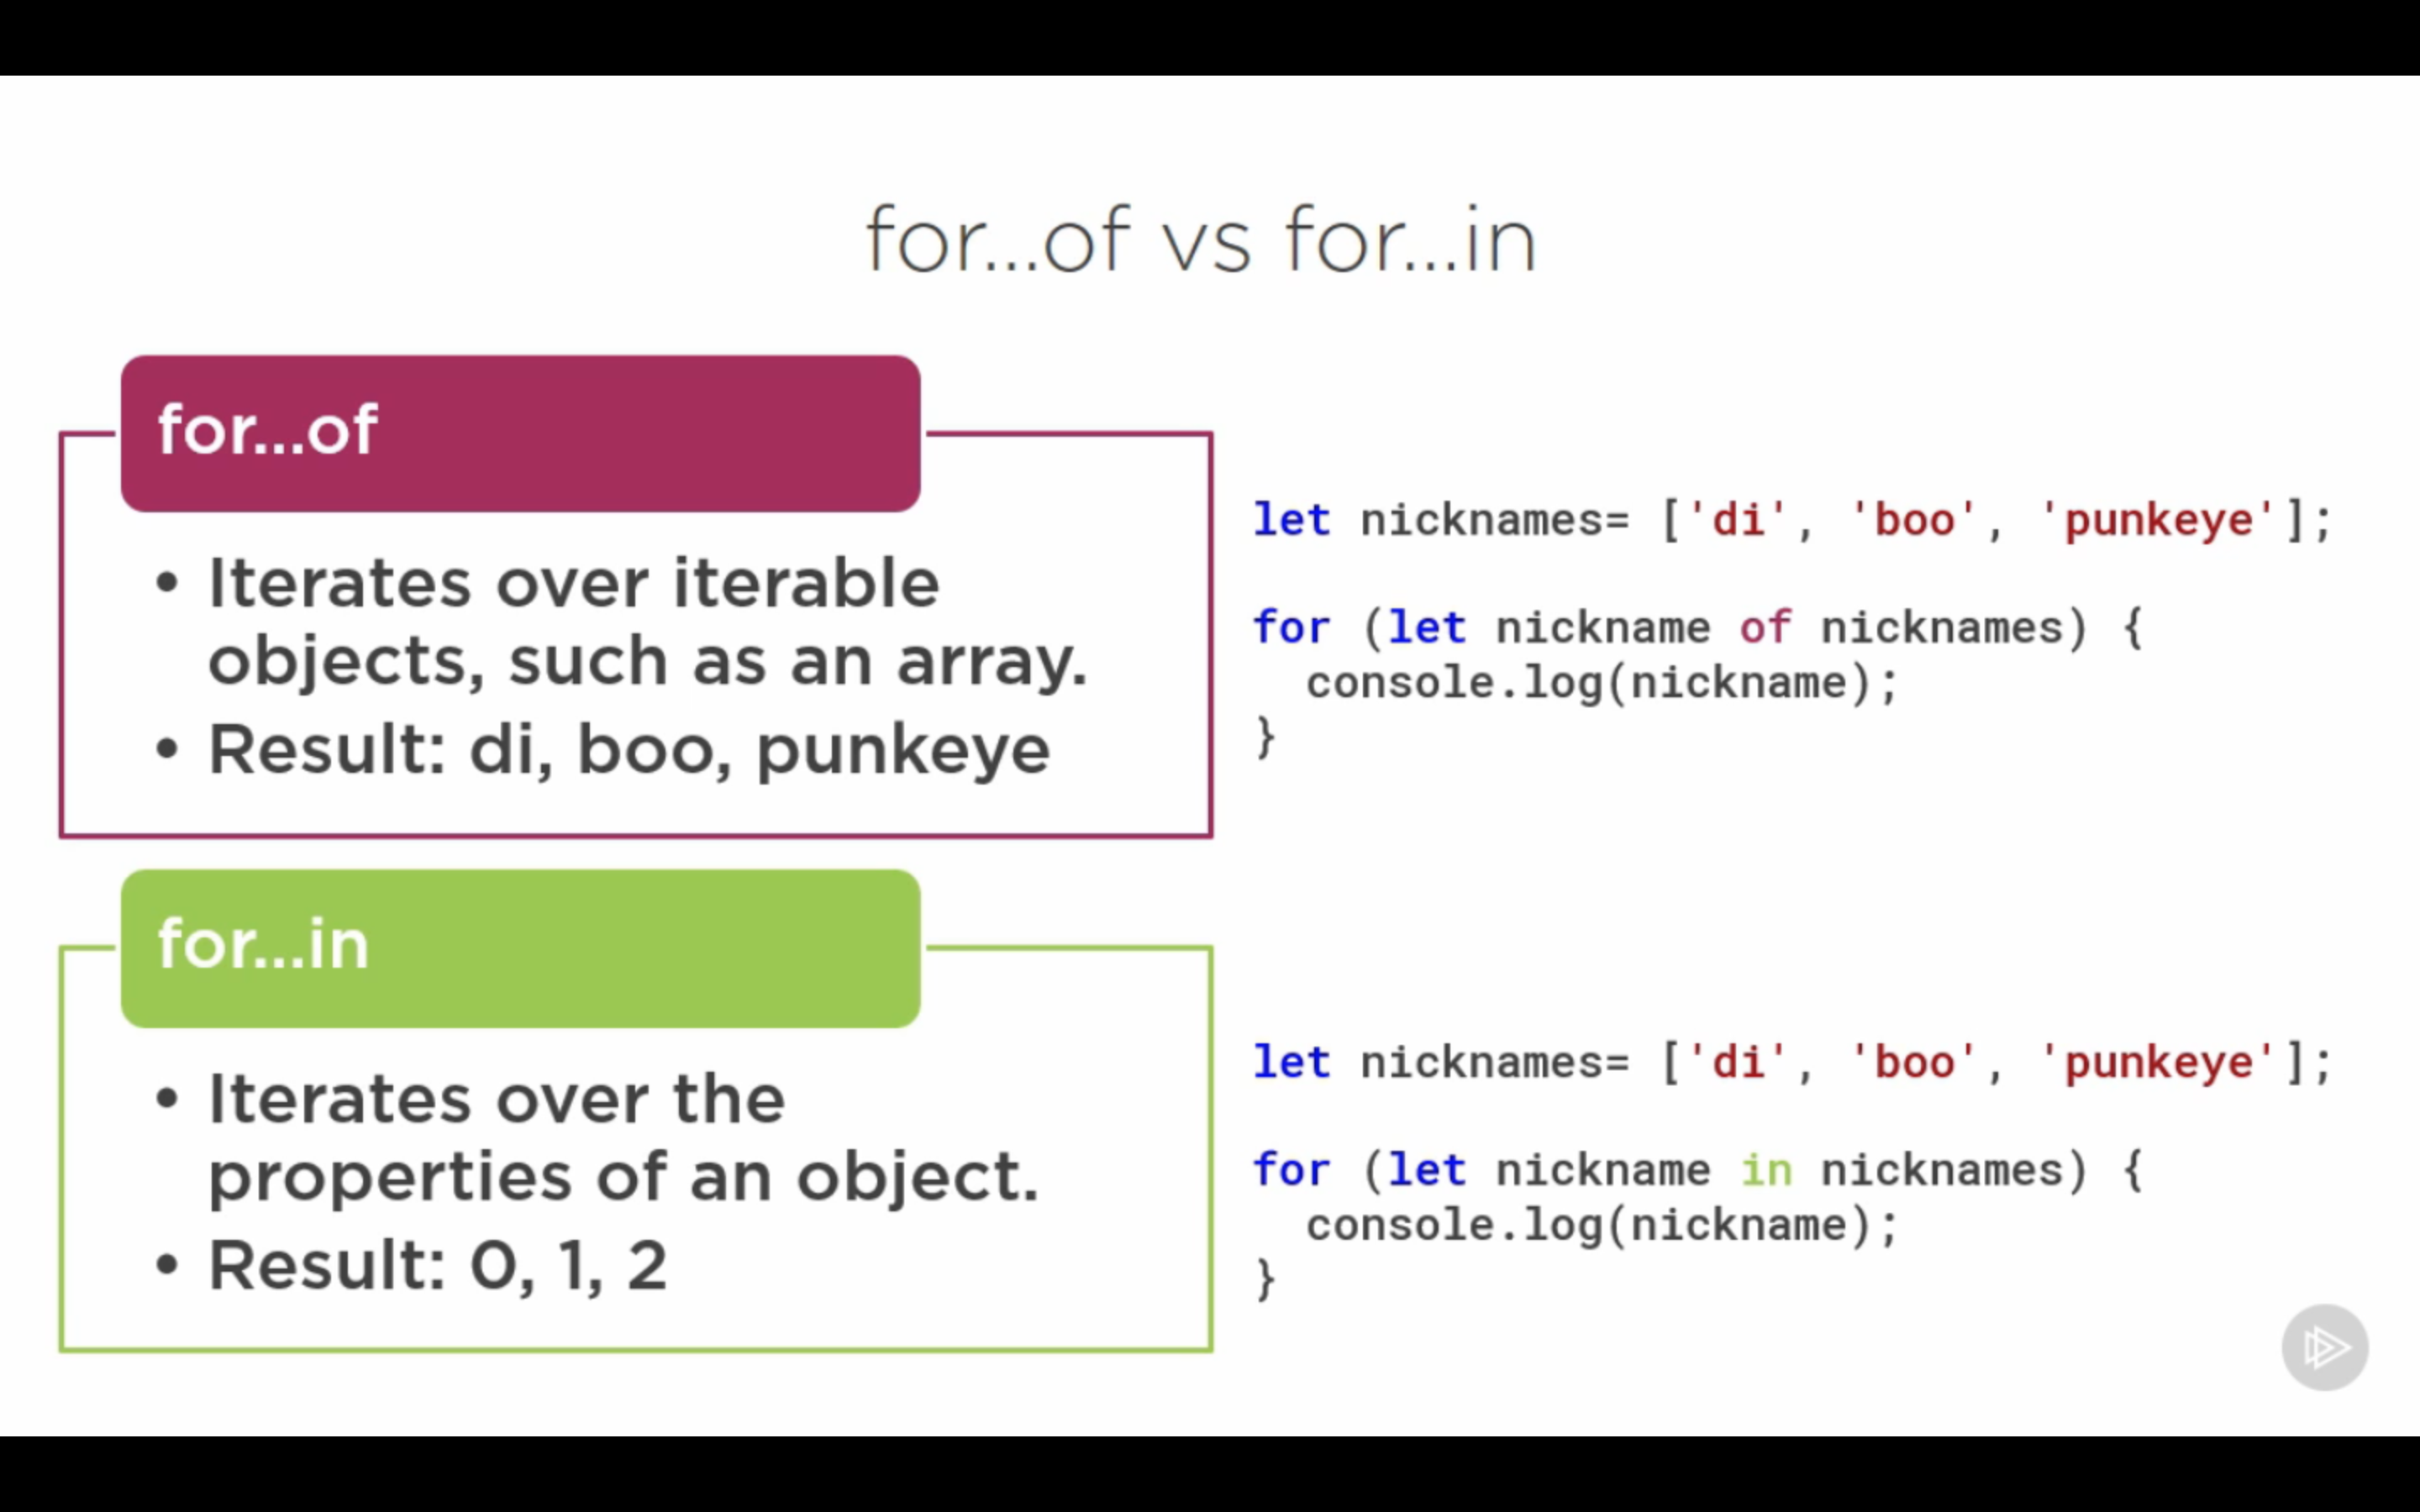
  22. For of Vs. For in

    for of vs. for in

  23. Nested Component

    • @Input() variablename: variabletype;, so the parent component can using this prop by prop binding

    • @Output()must be an event. eg: ` @Output() ratingClicked : EventEmitter = new EventEmitter();`.

    • Generics: allow us to identify a specific type that the object instance will work with

    • Use Event binding to respond to events from the nested component: use $event to access the event in nested component

  24. Service

    • Register services with angular injector, which maintains a container of active services instances. Injector create and manage single class or singleton as required.

      • Register a provider: create ro return a server or the service class itself.

      • Define as part of metadata

      • Inject to component and its children

    • Angular create single class of this service, called singleton, and holds onto it.

    • Component needs service: class define the service as dependency, injector provides and injects into constructor. constructor(private http:Http) { }(public, protect)

    • Dependency Injection: a coding pattern in which a class receive the instances of objects it needs(called dependencies) from an external source rather than creating them itself

    • Steps: the same as we define component and custom pipt

      • Create the service class

      • Define the metadata with a decorator

      • import what we need

  25. Service Checklist:

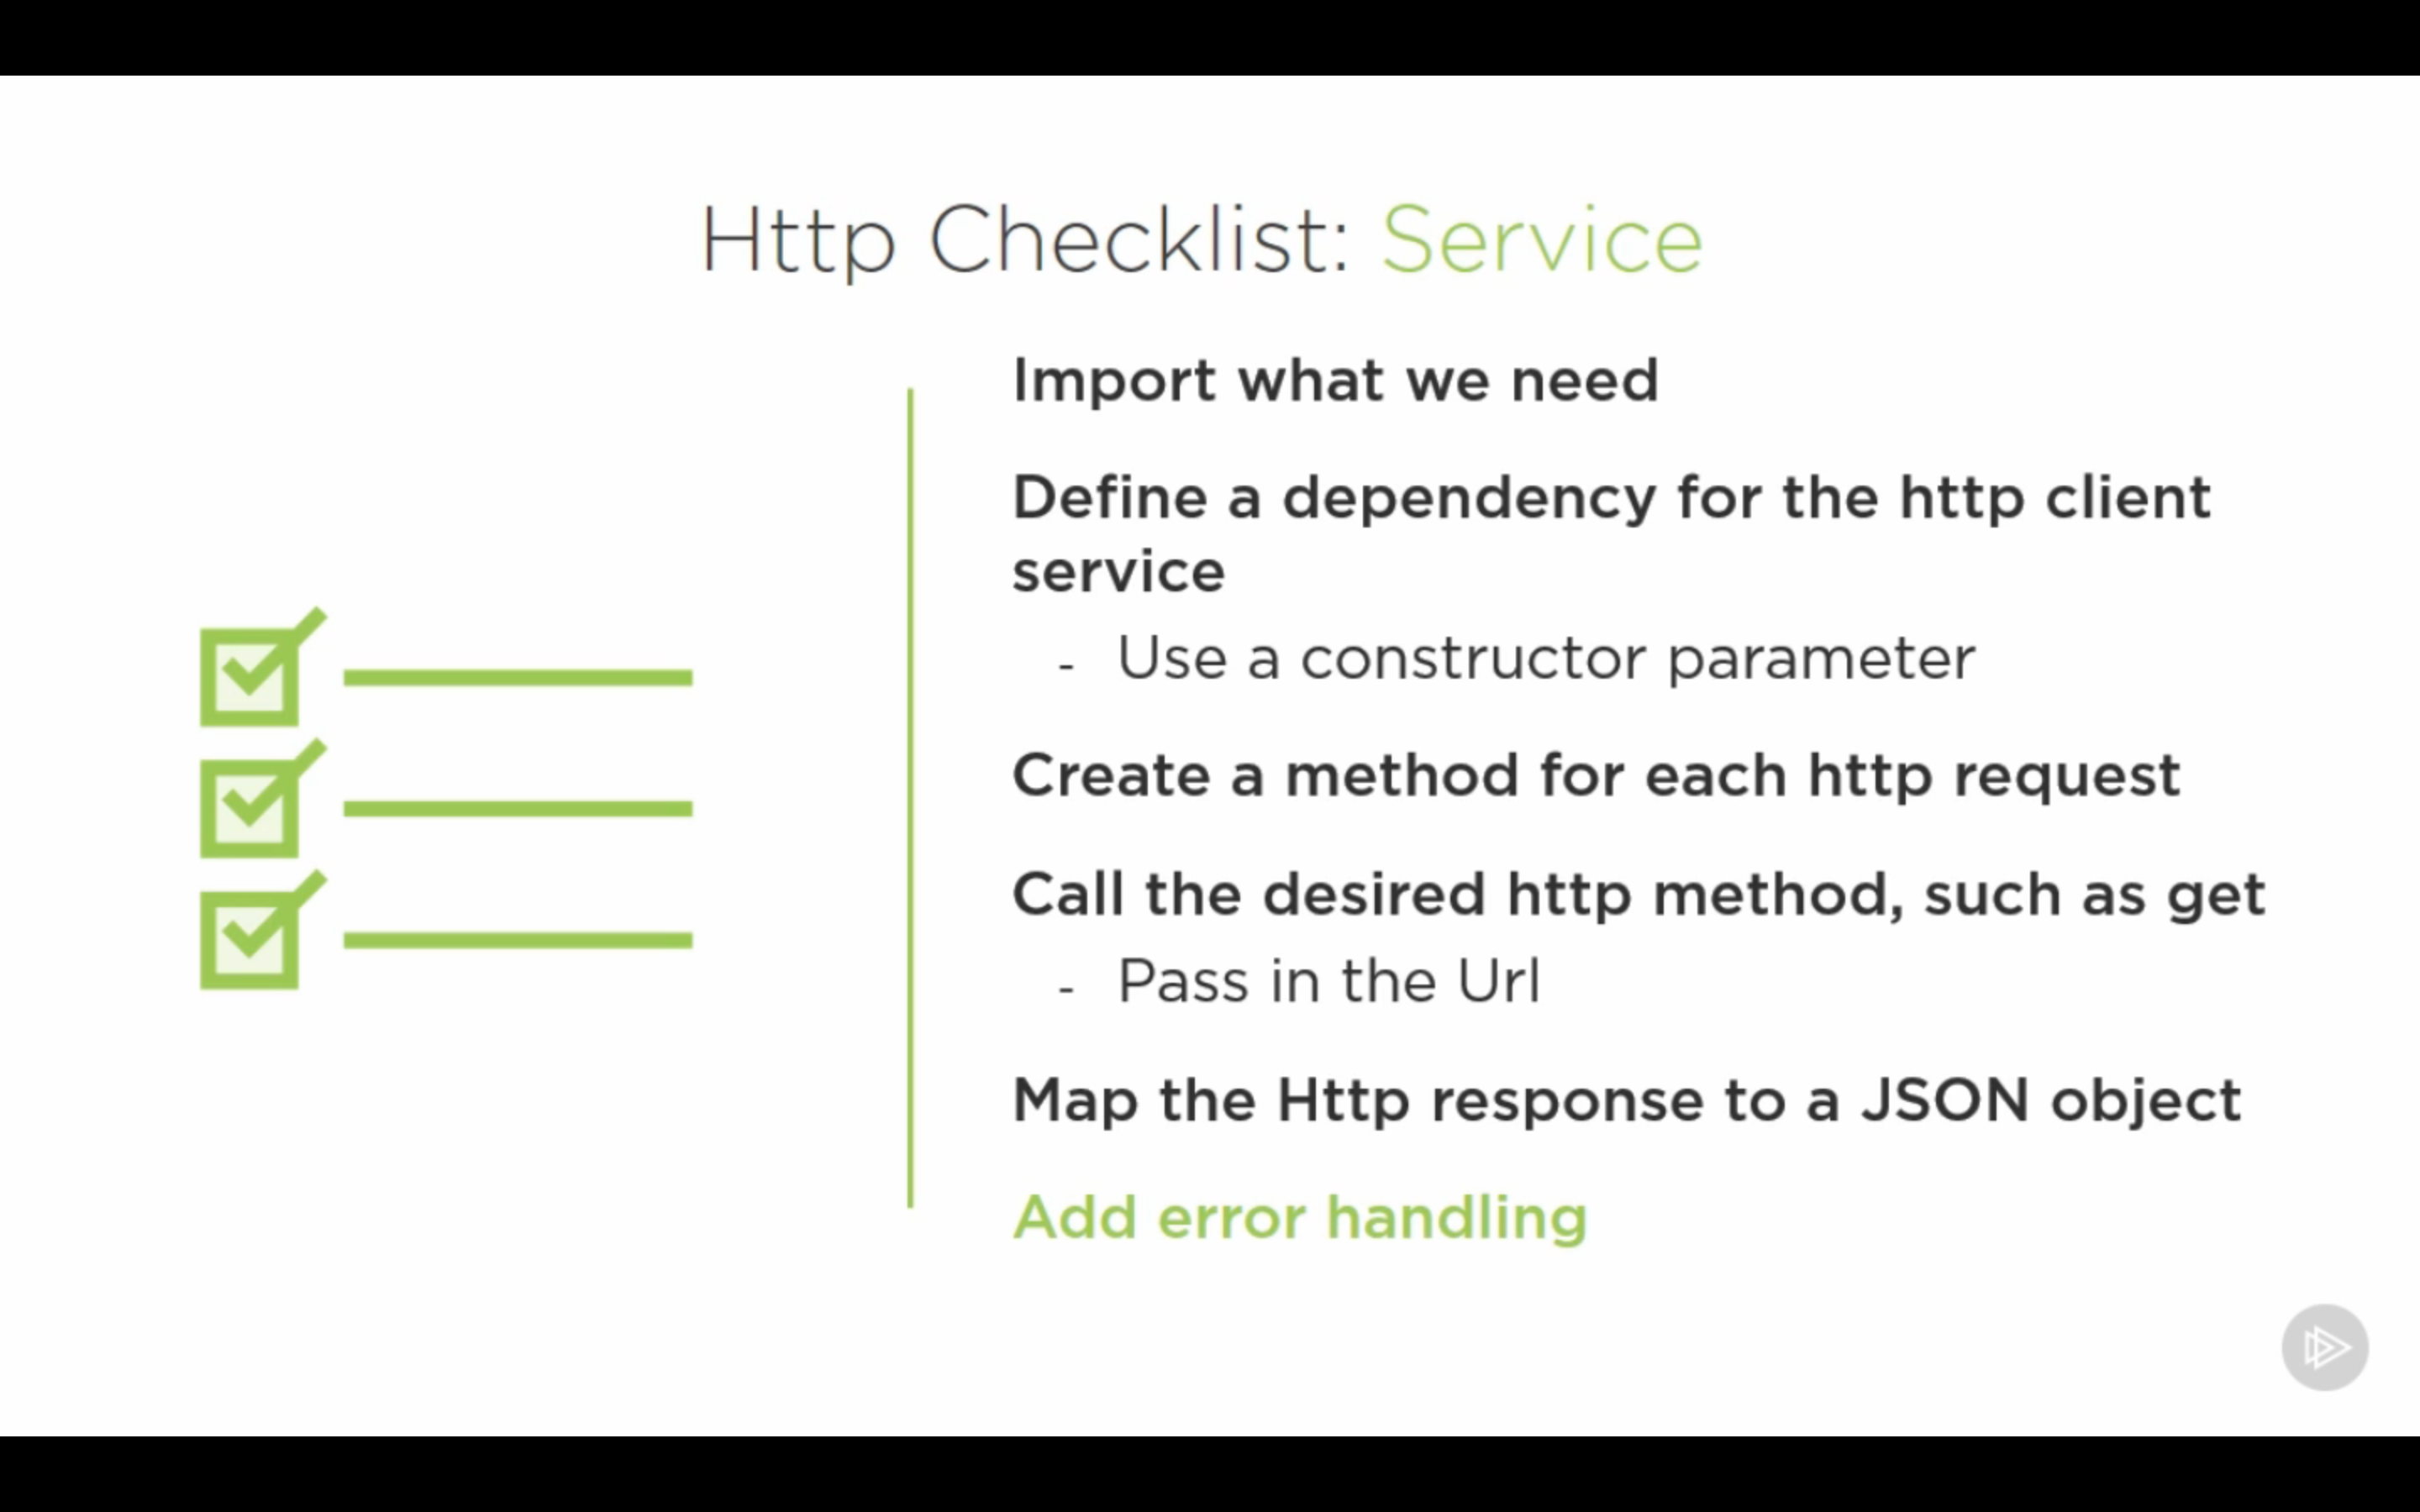
    1. Include the angular2 http script

    2. Register http_providers in appropriate location in the component hierarchy

    3. Import RXjs to load all responsive extension feature, such as : map, operator

    4. Define a dependency for http client service using a constructor parameter

    5. Create a method for each http request

    6. Call desired http method, pass in the url

    7. Map http response to a json file

    8. err handling

    9. In class that need service: call subscribe method to subscribe the observable; provide a function to handle an emitted item; provide an error function

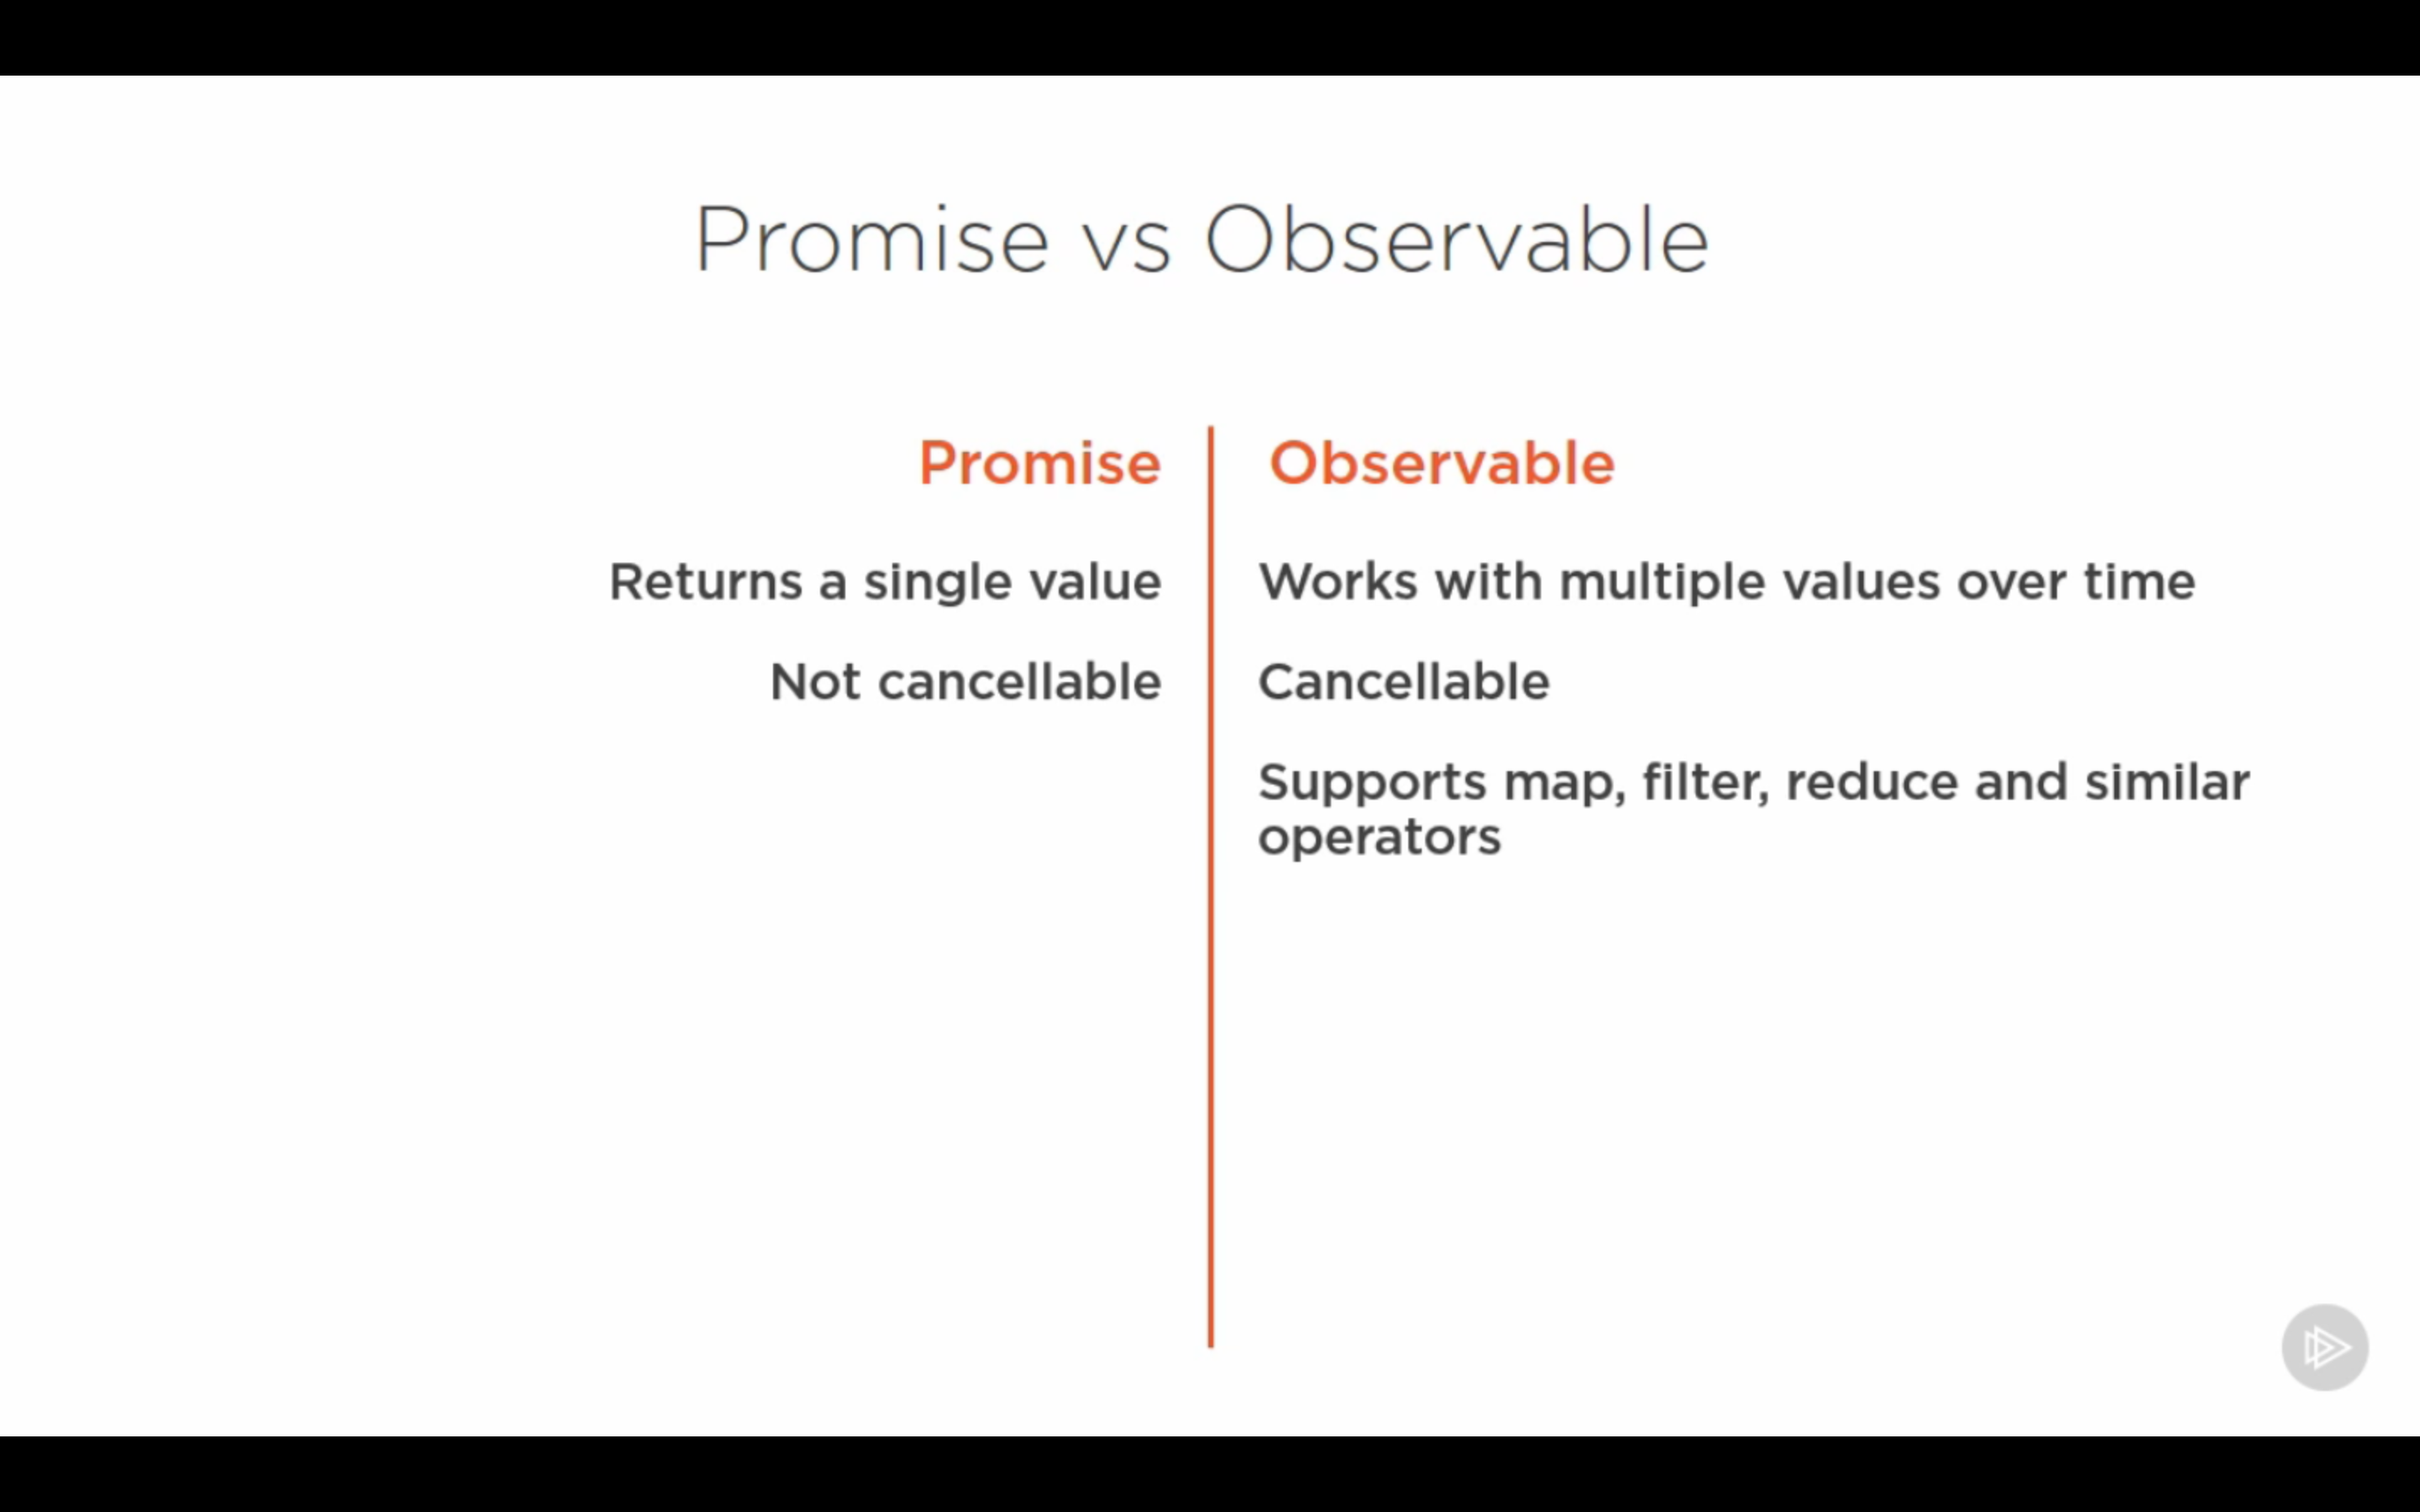
    Promise Vs Observable Service Checklist

  26. Routing

    1. Configure router for component

      1. Add router script

        1. path: url path segment for route

        2. name: route name, PascalCase

        3. Component: reference to the component itself, not in "", must be inported

        4. Set useAsDefault to true to use the default route

      2. Register routing providers:

        1. specify in directives array in component.ts

        2. add RouterLink directive as an attribute( on clickable element, enclosed in square brackets)

        3. RouteOutlet

        4. Passing params: { path: "products/:id/:productName", component: ProductDetailComponent },//app.module.ts; <a [routerLink] = "['/products', product.productCode, product.productName]"></a>//product-list.component.html; const id = this.activatedRoute.snapshot.params["id"];////product-detail.component.html, remmber to import

    2. Define options/actions

    3. Tie router to

    4. Active router based on user action, sometimes passing parameters

    5. Activating router display a view

Angular session notes

  1. in app.module.ts: decorator: @ngModule // if you want to create a module

  2. in app.component.tx: component, we must specify the selector, we can have multiple css file

  3. ng generate component products/product-list.component, cli creates all files needed and add products to app.module.tx

  4. copy selector: app-product-list from product-list.component.ts @Component, use this component in app.component.html as <app-product-list></app-product-list>

  5. npm install bootstrap, add path of bootstrap.min.css to configuration file, which is angular-cli.json, style

  6. prop binding, <img [src]="product.imageUrl" [title] = "product.productName"/>

  7. ngIf show image and hide

  8. pipe symbol

  9. create interface, the command are from github page : ng g interface interfacename. iproduct here set the type of all props

  10. ngOnInit, lift cycle, undestroy, unchange,

  11. put data in a service, then inject service into component: add provider in @Component

  12. import, specify(last bullet point), inject as dependency in constructor

  13. http, add this module in app.module.ts, import in service file

  14. in angular1 get response using promise, same in angular2

  15. import { Component, OnInit, Input} from '@angular/core';input, child component can use parent component’s data

  16. output, communication to parent

JavaScript ES6/ES2015 feature

|
  1.  <script src="https://google.github.io/traceur-compiler/bin/traceur.js"></script>
    <script src="https://google.github.io/traceur-compiler/bin/BrowserSystem.js"></script>
    <script src="https://google.github.io/traceur-compiler/src/bootstrap.js"></script>   
    
  2. let keywrod. it only visible for the block it was created

    if(true){
      var username = "xy";
      let cntr = 0;
    }
    document.write(cntr);
    
    for(let i=0;...){
        //use let here
    }
    
  3. const keyword, can not be changed after definde
    const ORG = "xy";
    const ORG = "xy";
    document.write(ORG);
    //get an error: Identifier 'ORG' has already been declared
    
  4. a new syntax

     var arr = ['ar','xy','hi'];
    
     //var username = arr[0];
     var [username,org,place]= arr;
    
     document.write(username);
     //output: ar
    

    or

     function retData(){
       var arr = ['ar','xy','hi'];
       return arr;
     };
    
     var [username,org,place]= retData();
     //we also can: var [ , ,place] = retData();
     document.write(username);
    

    or

     var userObj = {
       fn:"x",
       ln:"y",
       pl:"nj"
     };
    
     var {
       fn:fname,
       ln:lname,
       pl:place
     } = userObj;
    
     document.write(fname);
     document.write(lname);
     document.write(place);
     //output: xynj
    
  5. default value of parameters

     //given default value at below
     function abc(username="x",org="m"){
    
       return 'un='+username+',org='+org;
     }
    
     var resp = abc();
     //var resp = abc('newname',''newplace);
    
     document.write(resp);
    
  6. arrow function

     //old
     function add(x,y){
       return x+y;
     }
     //new in es6
     var add_new= (x,y)=>x+y;
     //or
     var add_new= (x,y)=>{
       return x+y;
     }
     document.write(add_new(4,5));
    
  7. using` back tic

     function add(x,y){
       // return "x:"+x+",y:"+y;
       //` here
       return `x:${x}`;
     }
    
     document.write(add(4,5));
    
  8. create class

     class user{
       getData(){
         return "xx";
       }
     }
    
     var user1 = new user();
    
     console.log(user1.getData());
    
  9. constructor, child class, super, if we have constructor in child class, we must call super

     class user{
       //constructor
       constructor(username){
           this.uname = username;
       }
          
       getData(){
         return "hi"+this.uname;
       }
     }
    
     class emp extends user{
       constructor(empCode,org){
         super(org);
         this.emp_code = empCode;
       }
       getEmpCode(){
         return "empcode:<br />"+this.emp_code;
       }
       getData(){
         return super.getData();
       }
     }
    
     //example before we have constructor in child class, we can use the code committed
    
     var user1 = new user("xyyy<br />");
     // var emp1 = new emp("emmm<br />");
     var emp2 = new emp("1<br />","emp2");
    
     document.write(user1.getData());
     // document.write(emp1.getData());
     document.write(emp2.getEmpCode());
     document.write(emp2.getData());
    
  10. Set

    var set1 = new Set(),
      arr = ["1","2","3"],
      obj = {"un":"xy"};
          
    set1.add("ar");
    set1.add(arr);
    set1.add(obj);
    
    set1.has(obj);
    
    set1.forEach(function(value){
      document.write(value+"<br />hi");
    });
    
    document.write(set1);
    document.write(set1.has(obj));
    set1.clear();
    document.write(set1.has(obj));
    /...true, false
    
  11. map

    var map1 = new Map();
    var obj = {
      "fn":"xy"
    };
    
    map1.set("un","ar");
    map1.set(obj,true);
    
    map1.forEach(function(value,key){
      document.write("k:"+key+",v:"+value+"<br />");
    });
    
    console.log(map1);
    document.write(map1.get("un"));
    //output:k:un,v:ar-k:[object Object],v:true-ar
    
  12. promise

    var promise1 = new Promise(function(resolve,reject){
      resolve('1');
    });
    var promise2 = new Promise(function(resolve,reject){
      reject('2');
    });
    var promise3 = new Promise(function(resolve,reject){
      resolve('3');
    });
    
    Promise.all([promise1,promise2,promise3]).then(function(data){
      console.log(data);
    },
    function(err){
      console.log(err);
    });
    //output:["1","2","3"](when all resolve)
    //output:2, when as above, promise2: reject
    //output:1, when Promise.all-->Promise.race
    
  13. import module

    //index.html
    <script type = "module" src="script.js"></script>
    
    //script.js
    import {abc, user_arr, user} from './mod.js';
    document.write(user.fn);
    //or use this:
    import * as moduleContent from './mod.js';
    document.write(moduleContent.user.fn);
    
    //mod.js
    export function abc(){
      return 'hello';
    }
    
    export var user_arr = ['ar','na'];
    
    export var user = {
      fn:"x",
      ln:"y",
      pl:"nj"
    }
    //or export everything in one line
    export {abc, user_arr, user}
    
  14. arguments, advanced arguments

     // import * as moduleContent from './mod.js';
    
     // document.write(moduleContent.user.fn);
    
    
     function abc2(...args){
       console.log("2:"+args);
     }
    
     function abc1(){
       console.log("1:"+arguments);
     }
    
     function abc3(...[username,org]){
       console.log("3:"+username+","+org);
     }
    
     function abc4(para1,phone,...[username,org]){
       console.log("4:"+username+","+phone);
     }
    
     abc1("1","2");
     abc2("1","2");
     abc3("1","2","3");
     abc4("ar","ma","pi","99");
    
     var arr = ["010","020"];
     var newa = ["1",...arr,"2"];
     console.log(newa);
    

JavaScript Basic Concept

|

0. Webpage

  1. Mostly used framework to implement responsive page layout: Bootstrap, now we have Bootstrap4

  2. Html5: specify the doc type. HTML become HTML5: Put this on the top of html file<!DOCTYPE html>

  3. input element can have many attributions:
    1. type, includes: date, email, password etc and text by default
    2. id of tag, unique identifier
    3. value
    4. name
    5. title
    6. any custom attributions like location, organization
  4. Local storage, Cookie session storage
    • Cookie: all browser information in client side
    • Local storage and session storage. session-temp; local-permanent
  5. CSS file reference should be on the top of page, javascript can be at bottom. better user experience, may need more loading time,
  6. Dynamic page, we need js
  7. JavaScript: Loosely-typed language: assign data type automatically

1. Object

  1. Objects are containers for named value.
  2. Object definition
    • Most simplest way: var user = {“name”:xy", “age”:18};
    • Using new keyword: var user = new Object(); user.name = "xy";
    • Using object constructor:

      function user(name, age, phone) { 
          this.name = name; 
          ...
          } 
      var user1 = new user("xy",...);
      
    • Notice here: If you try to call the user() without the new keyword. It returns undefined, because the user() is not returning anything, previously it was the new keywords which was returning you the object.
  3. Objects are addressed by reference.
    • See an example:var user = {“name”: “xy”, “age”:18}; var user1 = user; User1 is not a copy of user, it is the user itself, so any changes to user1 will reflect user.
  4. Object Properties

2. Object Properties

  1. var name = user.name;
  2. var name = user[“name”]
  3. for (key in user) { alert(key + “ ”+ user[key]); }
  4. Add prop:
     var userObj = {
         "username":"xy";
         "place":"nj";
     };
     userObj.addr = "Chi";
     for(key in userObj){
         //output
         document.write(userObj[key]);
     }
     document.write(userObj.place);
    
  5. delete user.name; //remove name property from user object
  6. functions as prop:
    var user = { 
        “firstname” : “xx”, 
        “lastname” : "yy", 
        “fullname” : function () { 
            return this.firstname + “ “+this.lastname;
            } 
    }  
    user.fullname(); 
    

3. functions

  1. Create function
    function display(username="xy", place="nj"){
        return username+','+place;
    }
    document.write(display());
    document.write(display("xy1","ny"));
    
    function abc(){
      var username = "xy",
          place = "nj";
      var display = function(){
          return username +","+ place;
      }
      return display;
    }
    
    document.write(abc()());
    
    //or
    var fn = abc();
    document.write(fn());
    
  2. anonymous function
     function(){
         return 'anonymous function';
     }
    
     var fn = function(){
         return 'anonymous function';
     }
     document.write(fn());
     //output anonymous function
     document.write(fn);
     //output all function body
    
     //anonymous function Can be passed as parameter to another function
     function display(fnName){
         return fnName;
     }
     document.write(display(fn()));
     //output anonymous function
    
  3. Self invoking function
     (fn = function(){
         return 'anonymous function';
     })();
    

4. Prototype

  1. Every JavaScript function has a prototype property
  2. Primarily for inheritance
  3. Methods and properties added to function’s prototype property will be available to all instances of that function
  4. An example: var user = new Object(); user Inherit from the Object.prototype.
  5. Adding new properties to existing prototype: user.prototype.fullname = function() { return this.firstname + “,“+this.lastname};
  6. We want define arr.display();

     var arr = ['ar',"br","cr"];
     Array.prototype.display = function(){
     //display array
     console.log(this);
     return this.concat(this);
     }
    
     arr.display();
    
     console.log(arr.display());
     //display arr twice in a array: ["ar", "br", "cr", "ar", "br", "cr"]
    

5. Math

  1. Math.min()/Math.max()
  2. Math.round(4.5) //output:5, round to the nearest integer value
  3. Math.ceil(); //round up
  4. Math.floor() //round down

6. Array

  1. Arrays are also special type of objects, Arrays uses numbered indexes and object uses named indexes
  2. arr.length
  3. arr[arr.length]=”aa”;
  4. array.push(‘99’); //add the element at the end of the array
  5. array.pop(); //remove the last element
  6. arr.shift() //remove the first element of an array
  7. delete arr[1];
  8. arr.splice(arr.indexOf(“aElement”));
  9. array.splice(2,1); //remove a particular element, eg: from index 2, remove 1 element
  10. array.indexOf(2); // find the index of given element value
  11. array.indexOf(2,4);//start from 4

7. String

  1. Can use single / double quotes to enclose the string.
  2. str.length
  3. escape the string, eg: var username = “argopan\”kumar”;
  4. str.indexOf("oneElement");
  5. test_str.match(“ar”) //Used to find an occurrence of a substring in a string.
  6. Both indexOf and match are case sensitive
  7. str.toUpperCase(); /str.toLowerCase();
  8. str.replace(new RegExp(',', 'g'), ''); , str.replace(‘username’, 'ar);
  9. str.substring(0,5);

8. Date

  1. var date_str = new Date();//Created using new Date();
  2. date_str.getFullYear(); // return current year
  3. date_str.setFullYear(2010) // set year
  4. date_str.getDay(); // return current day
  5. data_str.setDate(10);
  6. date_str.setDate(date_str.getDate() + 2); //Adding 2 days to the current day
  7. date_str.setFullYear(date_str.getFullYear() + 2); //Adding 2 years to the current year

9. HTML DOM(document object model)

  1. getElementById, document.getElementsByTagName, getElementsByClassName
  2. Changing content: .innerHTML
  3. Changing Attributes: .className
  4. Changing Style: .style
  5. Event binding: onclick
  6. EventListeners: document.getElementById("‘my_div’").addEventListener(“click”, test_fn);, removeEventListener(“click”, test_fn);
  7. window.onload = function(){...} make sure to load DOM element first
  8. Popup boxes: alert, confirm box, prompt box

10. Timeout/Interval

  1. timeout, interval
    setTimeout(function(){
    document.write('hello');
    },1000);
    
    setInterval(function(){
    document.write('hello');
    },1000);
    
    var interval_var = setInterval(function(){
    document.write('hello');
    },1000);
    
    setTimeout(function(){
    clearInterval(interval_var);
    },5000);
    

11. Arguments

  1. arguments,
function(){
    //return:["ar", "br", "cr", callee: ƒ, Symbol(Symbol.iterator): ƒ]
    console.log(arguments);
    //return a slice: ["ar", "br", "cr"]
    console.log(Array.prototype.slice.call(arguments));
}
abc('ar',"br","cr");

12. promise

doc here, very helpful.

  1. let promise = doSomething(); 
    promise.then(successCallback, failureCallback);
    //or
    doSomething().then(successCallback failureCallback);
    
  2. doSomething()
    .then(result => doSomethingElse(result))
    .then(newResult => doThirdThing(newResult))
    .then(finalResult => {
      console.log(`Got the final result: ${finalResult}`);
    })
    .catch(failureCallback);
    
  3. let myFirstPromise = new Promise((resolve, reject) => {
     setTimeout(function(){
    resolve("Success!"); // Yay! Everything went well!
      }, 250);
    });
    myFirstPromise.then((successMessage) => {
      console.log("Yay! " + successMessage);
    }, failureCallback);
    
  4. function abc(){
    var promise = new Promise(function(resolve,reject){
        setTimeout(function(){
        resolve('display');
        //reject(some http err, maybe)
        },3000);
    });
    return promise;
    }
    
    var resp = abc();
    //first func handles resolve, second handles reject
    resp.then(function(data){
    console.log("data,"+data);
    },
    function(err){
    console.log(err);
    })
    
  5. promise
    var fn = function(){
      setTimeout(function(){
        return 'called';
      },3000);
    };
    
    var resp = fn();
    
    document.write(resp);
    //output: undefined
    
    var fn = function(){
      var promise = new Promise(function(resolve,reject){
        setTimeout(function(){
            //resolve('called');
            reject('err');
                
          },3000);
      });
      return promise;
    };
    
    var resp = fn();
    
    document.write(resp);
    
    resp.then(function(data){
      document.write(data);
    },
    function(err){
      document.write(err);
    });
    

13. closure: inner function can access outer function variable.

//before:
var fn = function(){
  var cntr = 0;
  var inc = function(){
    cntr++;
    return cntr;
  };
  return inc();
};

var resp = fn();

document.write(resp+'<br/ >');
//output:1,1,1
//after
var fn = function(){
  var cntr = 0;
  var inc = function(){
    cntr++;
    return cntr;
  };
  return inc;
};

var resp = fn();

document.write(resp()+'<br/ >');
//output: 1,2,3
//return more than one func
var fn = function(){
  var cntr = 0;
  
  var inc = function(){
    cntr++;
    return cntr;
  };
  
  var reset = function(){
    return cntr=0;
  };
  
  return {
    'inc':inc,
    'reset':reset
  };
};

var resp = fn();
document.write(resp.inc()+'<br/ >');
//a funny example
function abc(a){
  return function(b){
    console.log("a+b",a+b);
    return function(c){
      console.log("all:",a,b,c);
      return a+b+c;
    }
  }
}

console.log("final:",abc(2)(3)(4));

14. js operate html

  1. dom props
     //js manipulate dom, js should load after html, at the buttom of html
     //or use this onload function in the top of js file to make sure the js code is executed
    
     window.onload = function(){
       var elem = document.getElementById('div');
       elem.innerHTML = 'div3';
          
       var elems = document.getElementsByTagName('div');
       elems[0].innerHTML = 'div1';
          
       //retrieve custom attribute using query selector
       var elem4 = document.querySelector('div[username="4"]');
       elem4.innerHTML = '4~';
     }
    
  2. js event handling

    window.onload = function(){
      document.getElementById('btn').onclick = function(){
        alert('hi');
      };
    }
    
    //change div content using input text
    window.onload = function(){
      document.getElementById('btn').onclick = function(){
        alert('hi');
        var content = document.getElementById("txtbx").value;
        document.getElementById('div').innerHTML = content;
      };
    };
    
  3. insertAdjacentHTML:
    • ‘beforebegin’: Before the element itself.
    • ‘afterbegin’: Just inside the element, before its first child.
    • ‘beforeend’: Just inside the element, after its last child.
    • ‘afterend’: After the element itself.
    window.onload = function(){
      document.getElementById('btn').onclick = function(){
      var newContent = '<h2>hi</h2>';
      //beforebegin
      //afterbegin
      //beforeend end of the element content
      //afterend
      document.getElementById('div').insertAdjacentHTML('beforeend',newContent);
      };
    };
    
  4. event listener

    //two kinds: element listener, event listener
    window.onload = function(){
      document.getElementById('btn').addEventListener('click',function(){
        alert('hi');
      });
    };
    
    window.onload = function(){
      function eventFn(){
        alert('hi');
      }
      document.getElementById('btn').addEventListener('click',eventFn);
      document.getElementById('btn2').addEventListener('click',function(){
        document.getElementById('btn').removeEventListener('click',eventFn);
      });
    };
    //click: alert, remove->click: no alert
    

A practice - shift input to output box and keep the order

  • script.js

      window.onload = function(){
        var interval_var ;
    
        function shift(direction,time){
          var leftElem = document.getElementById("input");
          var rightElem = document.getElementById("output");
          window.clearInterval(interval_var);
          interval_var = setInterval(function(){
            var leftStr = leftElem.value;
            var rightStr = rightElem.value;
            console.log(leftStr);
            if(direction == "toRight") {
              rightElem.value =  leftStr.substring(leftStr.length-1,leftStr.length)+rightStr;
              leftElem.value = leftStr.substring(0,leftStr.length-1);
              console.log("right",rightElem.value);
              if(leftElem.value.length===0){
                clearInterval(interval_var);
              }
            }
            if(direction == "toLeft") {
              rightElem.value = rightStr.substring(1,rightStr.length);
              leftElem.value = leftStr+rightStr.substring(0,1) ;
              console.log("left",leftElem.value);
              if(rightElem.value.length===0){
                clearInterval(interval_var);
              }
            }
          },time);
        }
        
        document.getElementById("btn1").addEventListener('click',function(){
          shift("toRight",1000);
        });
        document.getElementById("btn3").addEventListener('click',function(){
          shift("toLeft",1000);
        });
        document.getElementById("btn2").addEventListener('click',function(){
          clearInterval(interval_var);
        });
      };
    
    • html:
      <body>
          <h1>Hello Plunker!</h1>
          <div id = "div">
            shift
          </div>
          <br/> 
          <input type="text" id = "input" value = "default"/>
          <input type="text" id = "output"/><br/>
          <input type="button"  id="btn1" value=">>" />
          <input type="button"  id="btn2" value="||" />
          <input type="button"  id="btn3" value="<<" /> 
        </body>
      

Salesforce Lightning

|
  1. Lightning apps let you brand your apps with a custom color and logo. You can even include a utility bar and Lightning page tabs in your Lightning app. They also give your users access to sets of objects, tabs, and other items all in one convenient bundle in the navigation bar.

  2. So what things can you put in a Lightning app?
    • Most standard objects, including Home, the main Chatter feed, Groups,and People
    • Your org’s custom objects
    • Visualforce tabs
    • Lightning component tabs
    • Canvas apps via Visualforce tabs
    • Web tabs
    • Lightning page tabs and utilities like Lightning Voice
  3. Tips for Creating Apps in Lightning Experience
    • Talk to your users. Ask them what their priorities are.
    • Customizing tabs in apps gives you a unique opportunity to engage with your users.
    • Each group of users has its own priorities. Find out which objects and items represent their highest priorities.
    • Ask users to post feedback to a chatter group
    • Publish polls
    • Schedule lunch sessions
  4. Customize list view for one standard object,
    • Create new list view
    • Add filter by setting a specified field, operator and target value.
    • Customize by selecting fields to display.
    • Also can create list view chart on a standard object page.
  5. Customize record highlights with compact layouts
    • Compact layouts control the fields your users see in the highlights panel at the top of a record and the fields that appear in the expanded lookup card you see when you hover over a link in record details.(shows on one page but set on different object compact layout)
    • Create new compact for an object in object manager and assign it to the object.(Make it the primary compact layout)
  6. Lightning pages are a collection of Lightning components arranged in regions on the page. You can customize the layout of the page and the position of its components with the Lightning App Builder

  7. Two ways to customize a page in Lightning experience. Customize a page’s layout(), customize its content(page layout editor).

  8. Customize Record details with page layouts using Page layout editor:
    • Control which fields(and order of fields), lists of related records, and custom links users see
    • Determine whether fields are visible, read only, or required
    • Control which quick actions appear on the page
  9. Enhanced Page Layout Editor
    • is the go-to place for customizing a Lightning Experience record page’s fields and related lists.
    • has two basic parts: a palette on the upper portion of the screen and the record’s page layout on the lower portion of the screen.
    • This Highlights Panel section in the page layout editor controls the highlights panel on pages in our Classic UI. It’s of no use to us in Lightning Experience.
  10. Create a new page layout and assign it to profile so somebody can see it.

  11. Custom Buttons and Links
    • Custom links can include Salesforce fields as tokens within the URL.

Useful link:

  1. Creating Custom Web-To-Case Forms Using Visualforce and Sites
  2. user interface setting
  3. JIRA(Atlassian) for agile team, to plan track and release, real-time reporting, match the way your team works, create issue easy and manage bug by dragging, check the bug log. convenient.
  4. Conga for data management, salesforce appexchange