
Get start with Angular2 - products management
27 Jul 2017 | Angular2 Front-end JavaScriptTypeScript
-
Open source language
-
Strongly type
- TypeScript type definition files (libraryname.d.tx)
-
Transpiles to plain javascript
-
Class-based, Object-oriented
npm
-
Node Package Manager for JavaScript
-
is a command line utility that interacts with repositories of open source projects
Manually setup Angular2 application
-
Create an application folder
-
tsconfig.json
-
package.json
-
typings.json
-
Install libraries and typings
-
index.html (entrypoint of application)
-
main.tx(bootstrapper) file to bootstrap the angular application with the root component
Using Angular tool cli to setup Angular2 application(Prefer)
-
Make sure you have installed node.js
-
install cli following this instruction https://github.com/angular/angular-cli
-
Navigate to http://localhost:4200/
-
angular-cli.json all configuration –> index.html, main.ts, app.module.ts, app.component.ts, (import)
Products Example
-
Architecture: index.html is comprised of
-
App components:
-
welcome component,
-
product component
- star component
-
product detail component
-
-
Product data service
-
-
Outline:
-
Components, life cycle
-
Template, Interpolation, Directives for user interface
-
data binding, pipes
-
nested components and communication between container and nested component
-
service and dependency injection(inject services into component)
-
Retrieving data using http, communicate with back-end server
-
Setup routing to navigate between user views
-
Angular Basic
-
Components make applications, component = template+class(including props, methods)+metadata
-
Modules: Help code organization, resolve namespaces issues
-
ES2015 file is a module, module is a file. Angular2 uses ES2015 modules
-
Modules in ES2015.
-
We have code
export class Product{...}in product.ts file, this export keyword indicates that we can import this product module in any other modules -
import classname from classpath:
import { Product } from 'pathofproduct.ts'. (Notice that we import the js file, the compiled .ts file. The reason we do not need to specify the file type is because we have set the default extension for files in system.config)
-
-
Common name convention in angular: name each component class with the feature name, then append the Component as suffix
-
A class becomes an angular component when we give it component metadata.
-
Define properties and methods in class
-
propname, colon, data type, value :
pageTitle : string = "example";; -
function name, colon, return value
toggleImg() : void{...}. -
Methods after properties
-
-
Decorator:
-
Define component metadata within an angular component function, and typeScript will attach that function to the class as a decorator.
-
Using function to add metadata to a class, it’s a javascript language feature implemented using typescript.
-
Scope of decorator is limited to the feature it decorates.
-
Prefix with @ (‘at sign),
-
Angular have several built-in decorators, we can also build custom decorators
-
Define decorator above the class signature. No semicolon followed
-
Use component decorator to identify the class as a component. Since it’s a function, we add parenthesis and pass object with props.
-
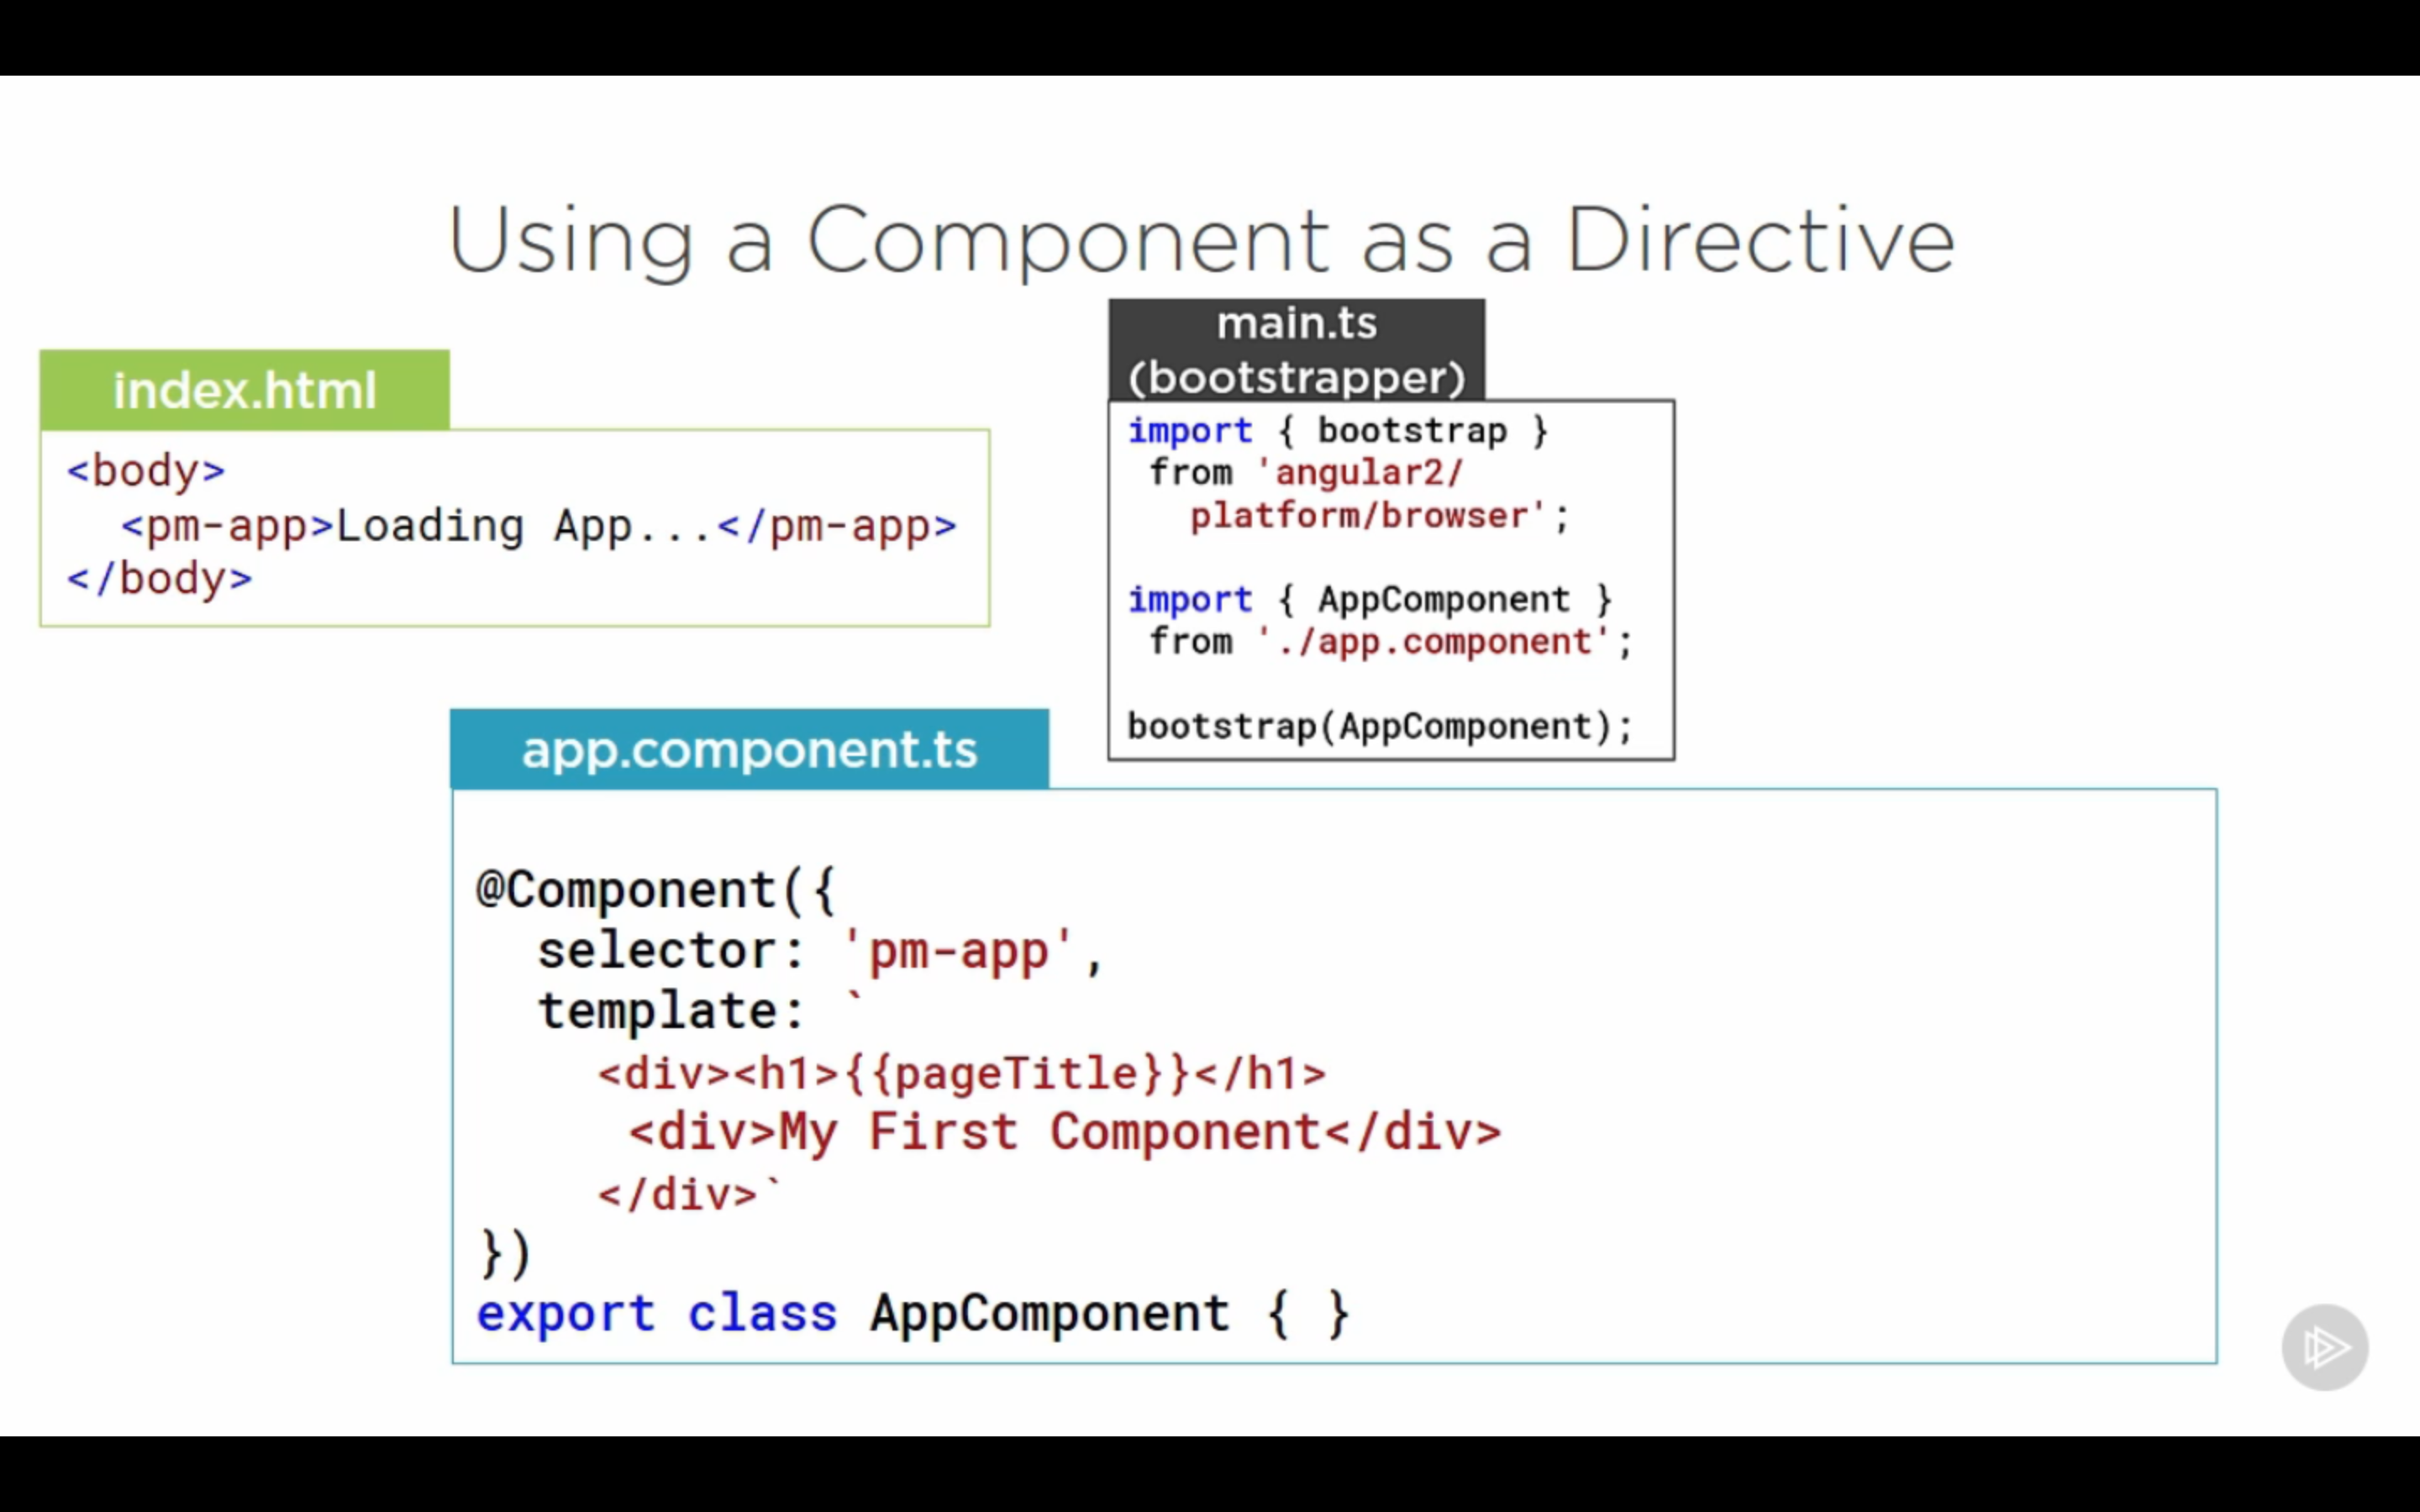
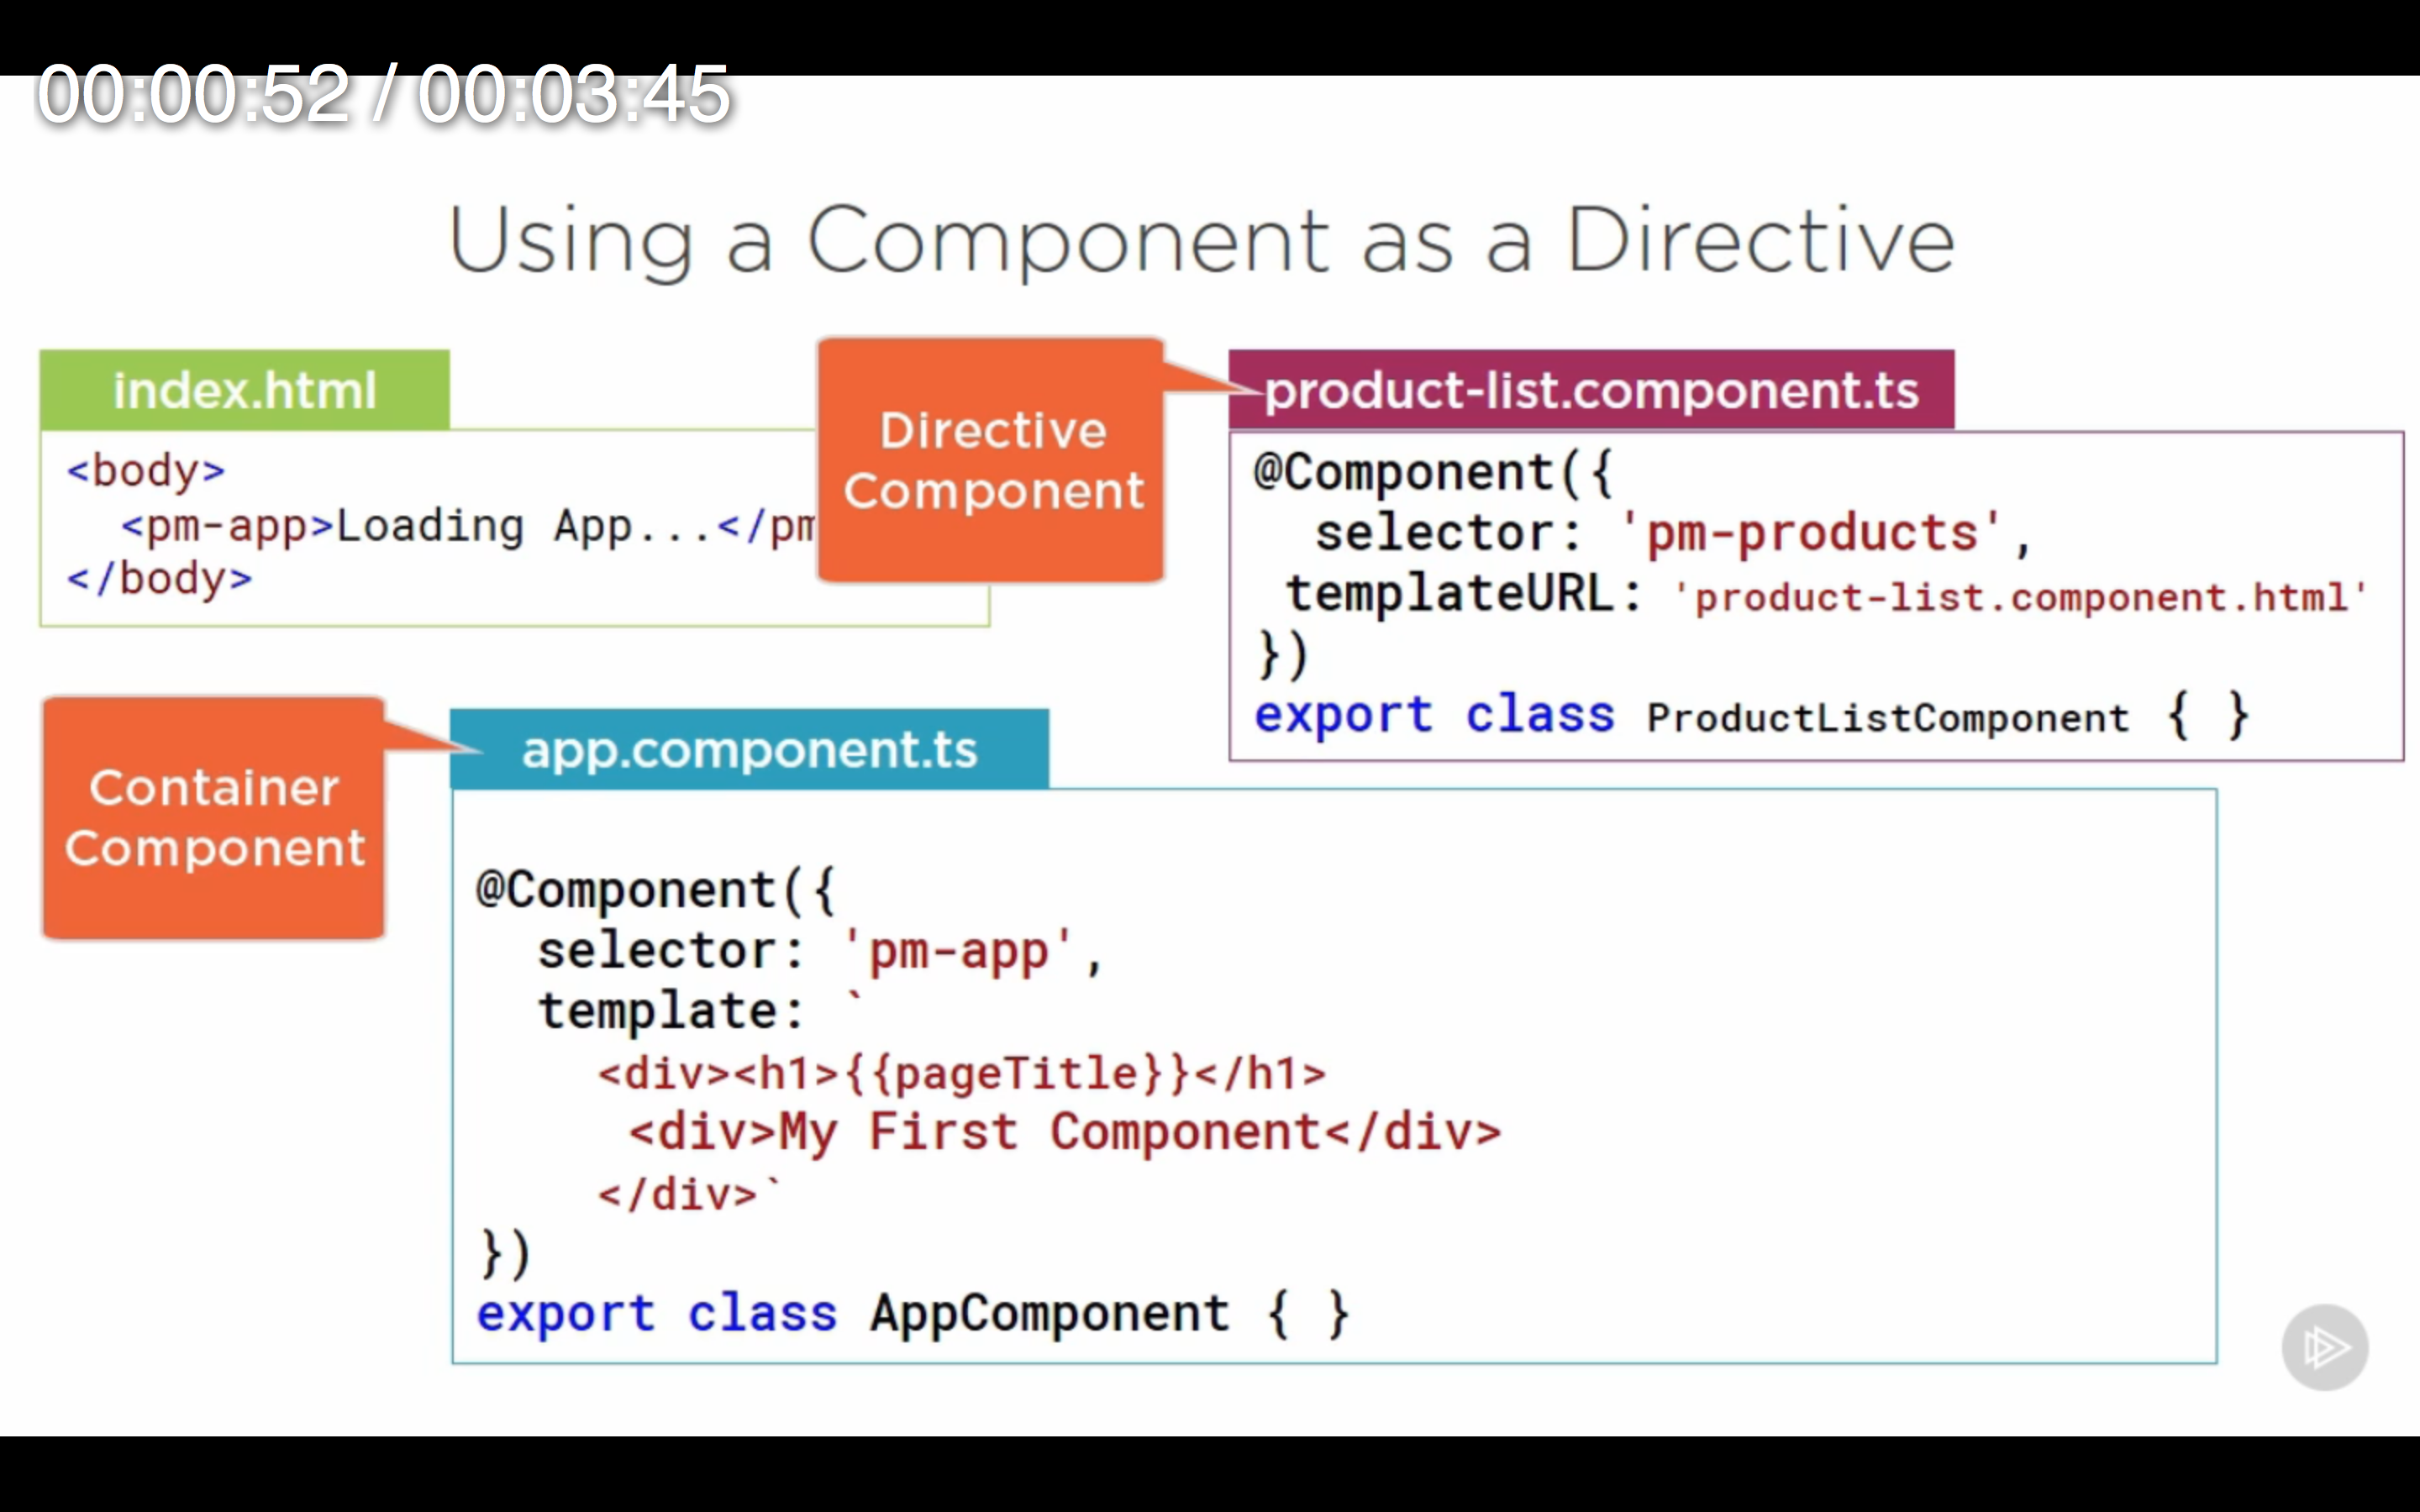
selector : component’s directive name used in HTML. Directive is a custom HTML tag. Whenever this directive is in HTML, angular render this component’s template.
-
template: view layout
-
-
-
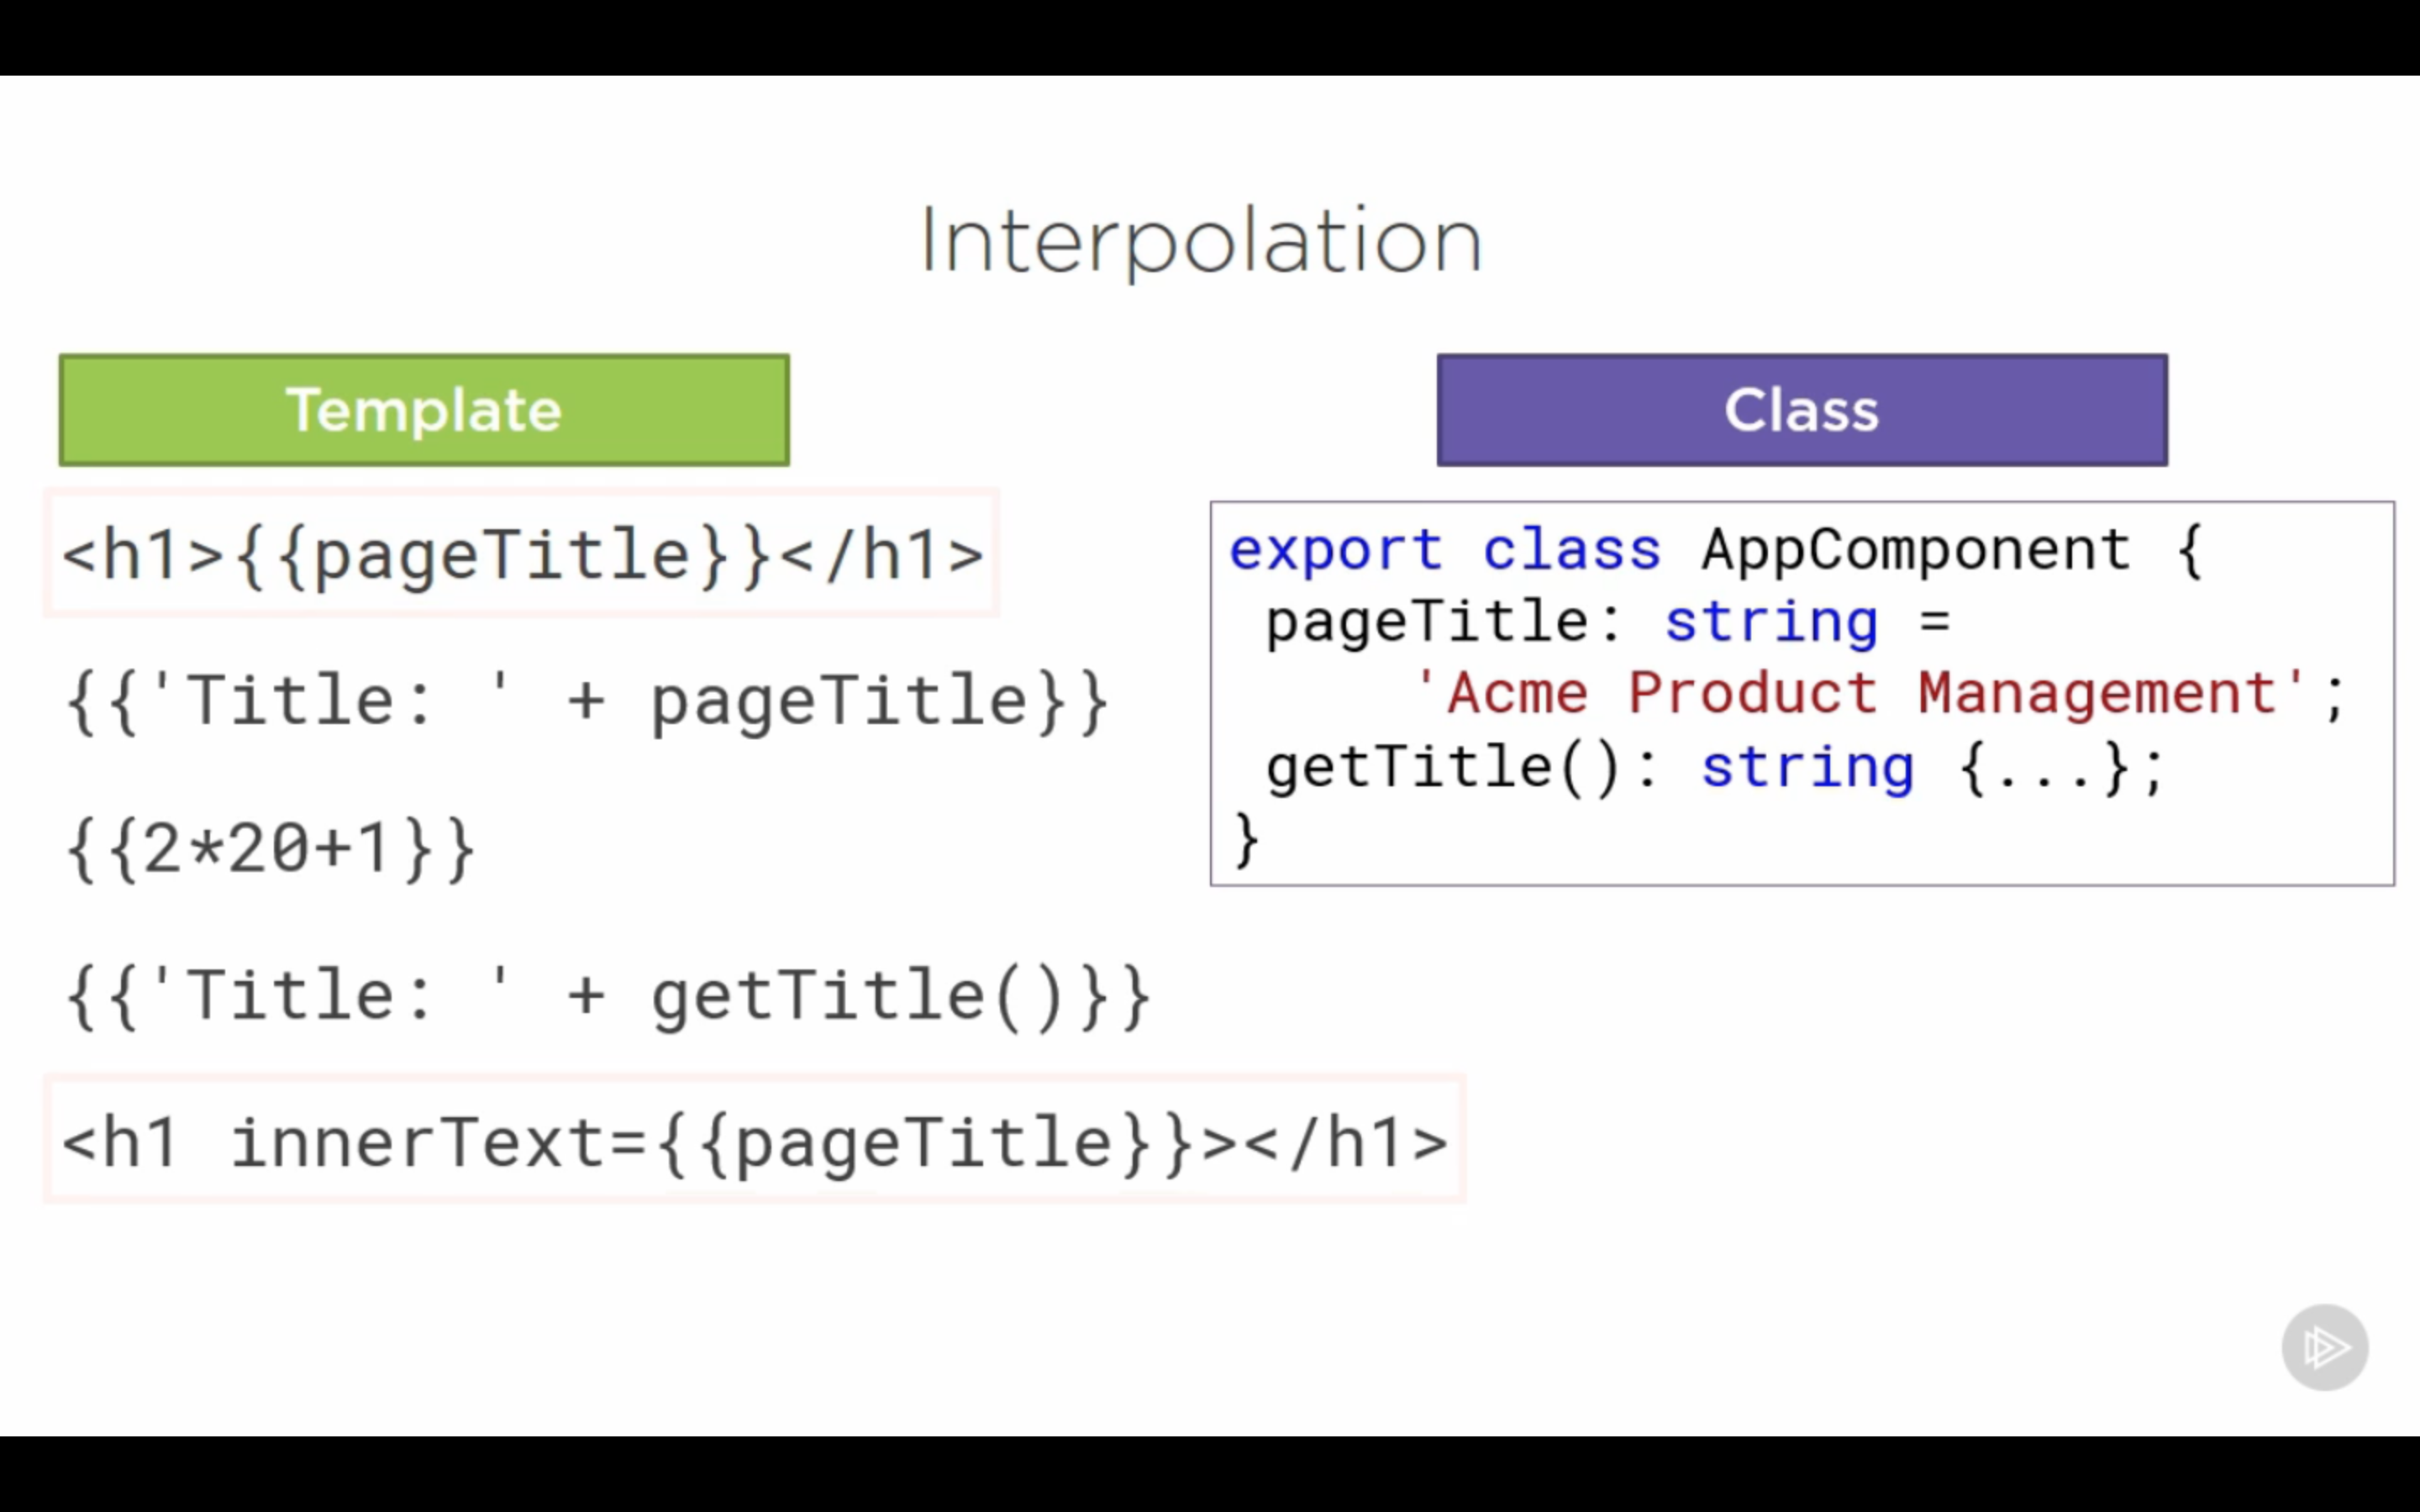
Data binding, double curly braces,
-
When we want to use external class and functions, we need to define where to find it using import on the top of the code file.
-
Angular is modular: core, animate, http, router
-
Checklist for coding component
-
Class –> code
-
Clear Name: Pascal casing; Append “component”
-
Export keyword
-
Data in props : appropriate data type and default value; camelCase with the first letter lowercase
-
Logic in methods
-
-
Decorator –> metadata
-
Component Decorator: prefix with @; suffix with () because it’s a function
-
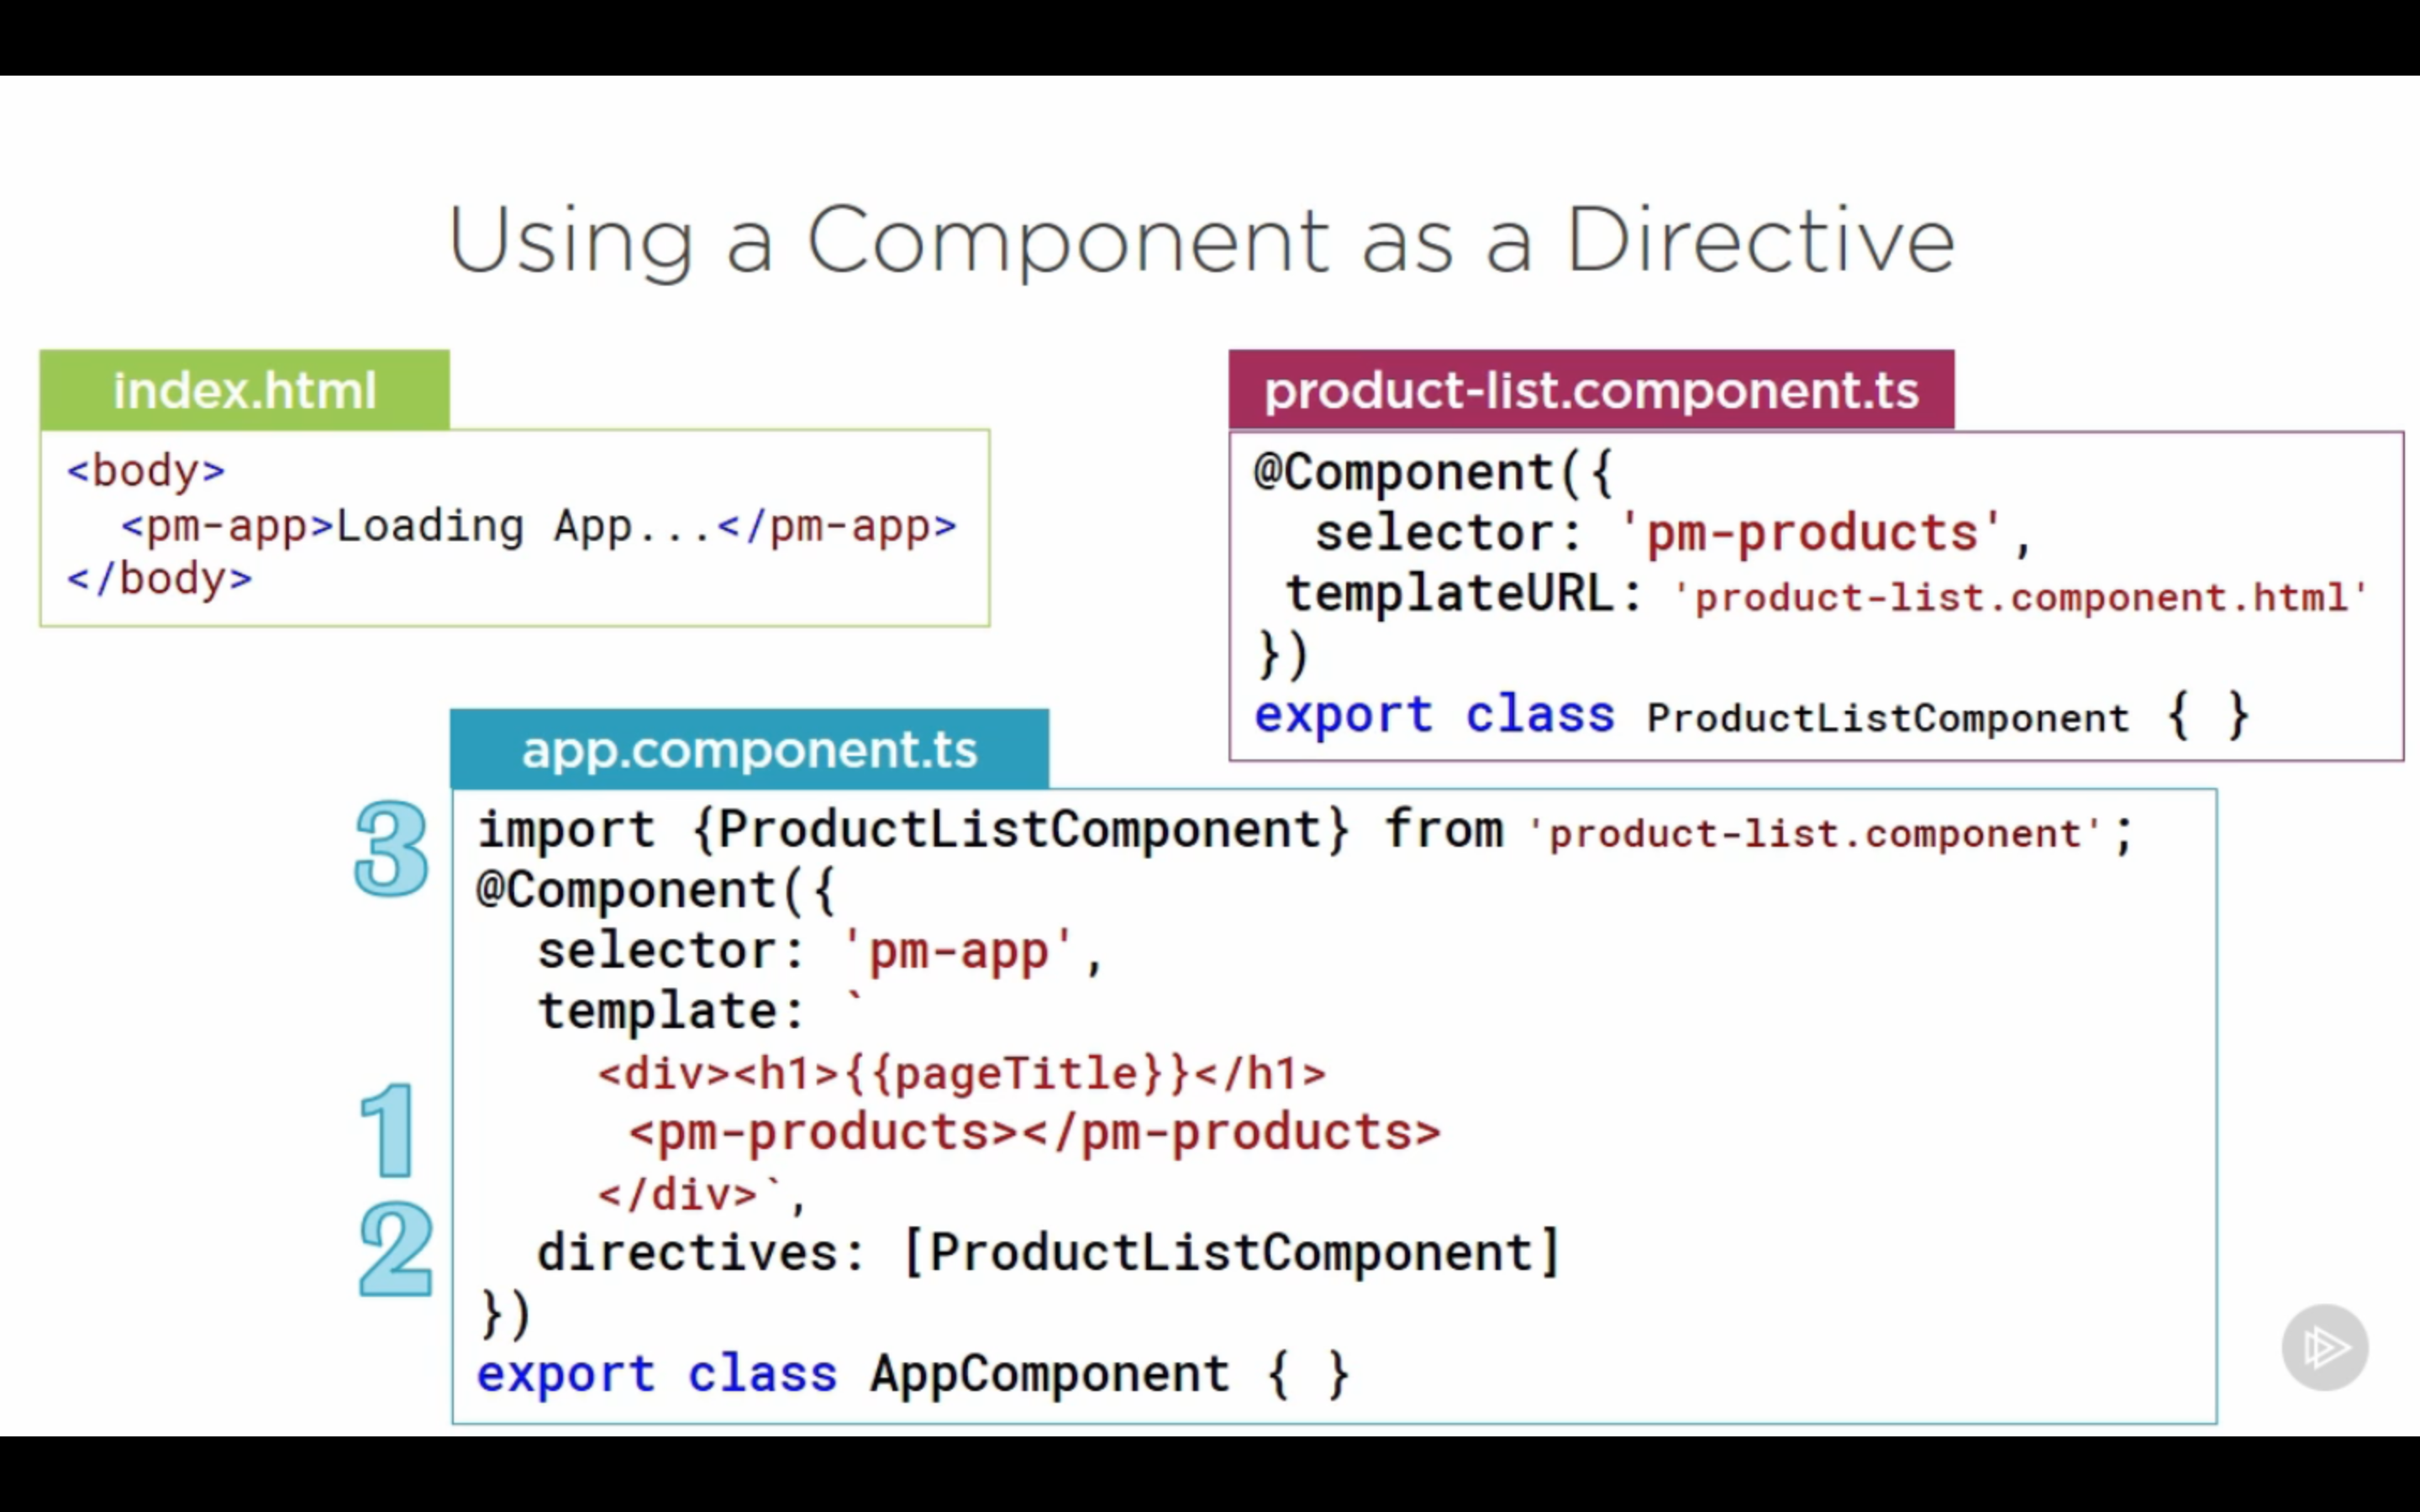
Selector: Directive, component name we use directly in HTML, if we do not use this component in html, we can ignore this selector prop
-
Template
-
-
Import
-
-
Using component as directive
-
Directives:
-
Custom Directives
-
Angular Built-in Directives
-
Structural directives: modify the structure or layout of a view by manipulating element in their children.
*marks(asterisk) the directives as structural directives -
<table class='table' *ngIf='products && products.length'>if the right side evaluates to a false value , remove this element and its children from DOM. If products exists and length!=0, show the table -
<tr *ngFor='let product of filteredProducts'>` ‘#product of products’` the #(hash symbol) means it is a local variable uses only in this template. Assign to a quoted string expression
-
-
-
any[] is the data type used when we aren’t sure about the datatype in typescript.
-
Data Binding with Interpolation
-
Property binding ( [] ): set property of an element to value of a template expression
-
Binding source are always enclosed in quotes
-
Binding targets as always enclosed in square brackets []
-
[binding target] = ‘binding source’;, eg<img [src]='product.imageUrl' [title]='product.productName' [style.width.px] = 'imageWidth' />;<img src = 'http://somewebsite/'>(binding using interpolation)
-
-
Event binding ( () ): bind an event to an element
-
Target event is always enclosed in parentheses
-
Component class method will always be enclosed in quotes
-
(target event) = ‘method()’;eg:<button (click)='toggleImage()' class="btn btn-primary">Show image</button>
-
-
Two way binding: component–prop–>dom, dom–events–>component.
-
Syntax [(ngModel)] = ‘property name’; []+(),prop binding + event binding, [()]-banana in the box
-
filter input element:
<input type="text" [(ngModel)] = 'listFilter' /> <h3>Filtered by : </h3>
-
-
Pipes: transform data, separated with colons <td></td>, ``, ` <tr *ngFor = “let product of productsproductFilter : filterList”>` -
Improving components
-
Strong typing & Interface:
-
Create interfaces to strongly type a property, use interface as a data type.
-
Interface is a specification identifying a related set of properties and methods, a class commits to supporting the specification by implementing the interface
-
Development time only.
-
(properly cycle event, transform data to user friendly values as needed)
-
-
Encapsulating styles: ensure styles do not leak out to any other components. Add ` styleUrls: [’./product-list.component.css’]` in decorator
-
Lifecycle hooks:
-
Component have a life cycle: Create –> Render –> Create and render children –> process changes –> destroy
-
Most commonly use:
-
OnInit: initialization, retrieve data
-
OnChange: Perform actions after angular sets data binding input props
-
OnDestroy: cleanup
-
-
-
Custom pipes:
transform(value: Iproduct[], args?: string)question mark marks the parameter as optional. -
Nested component
-
-
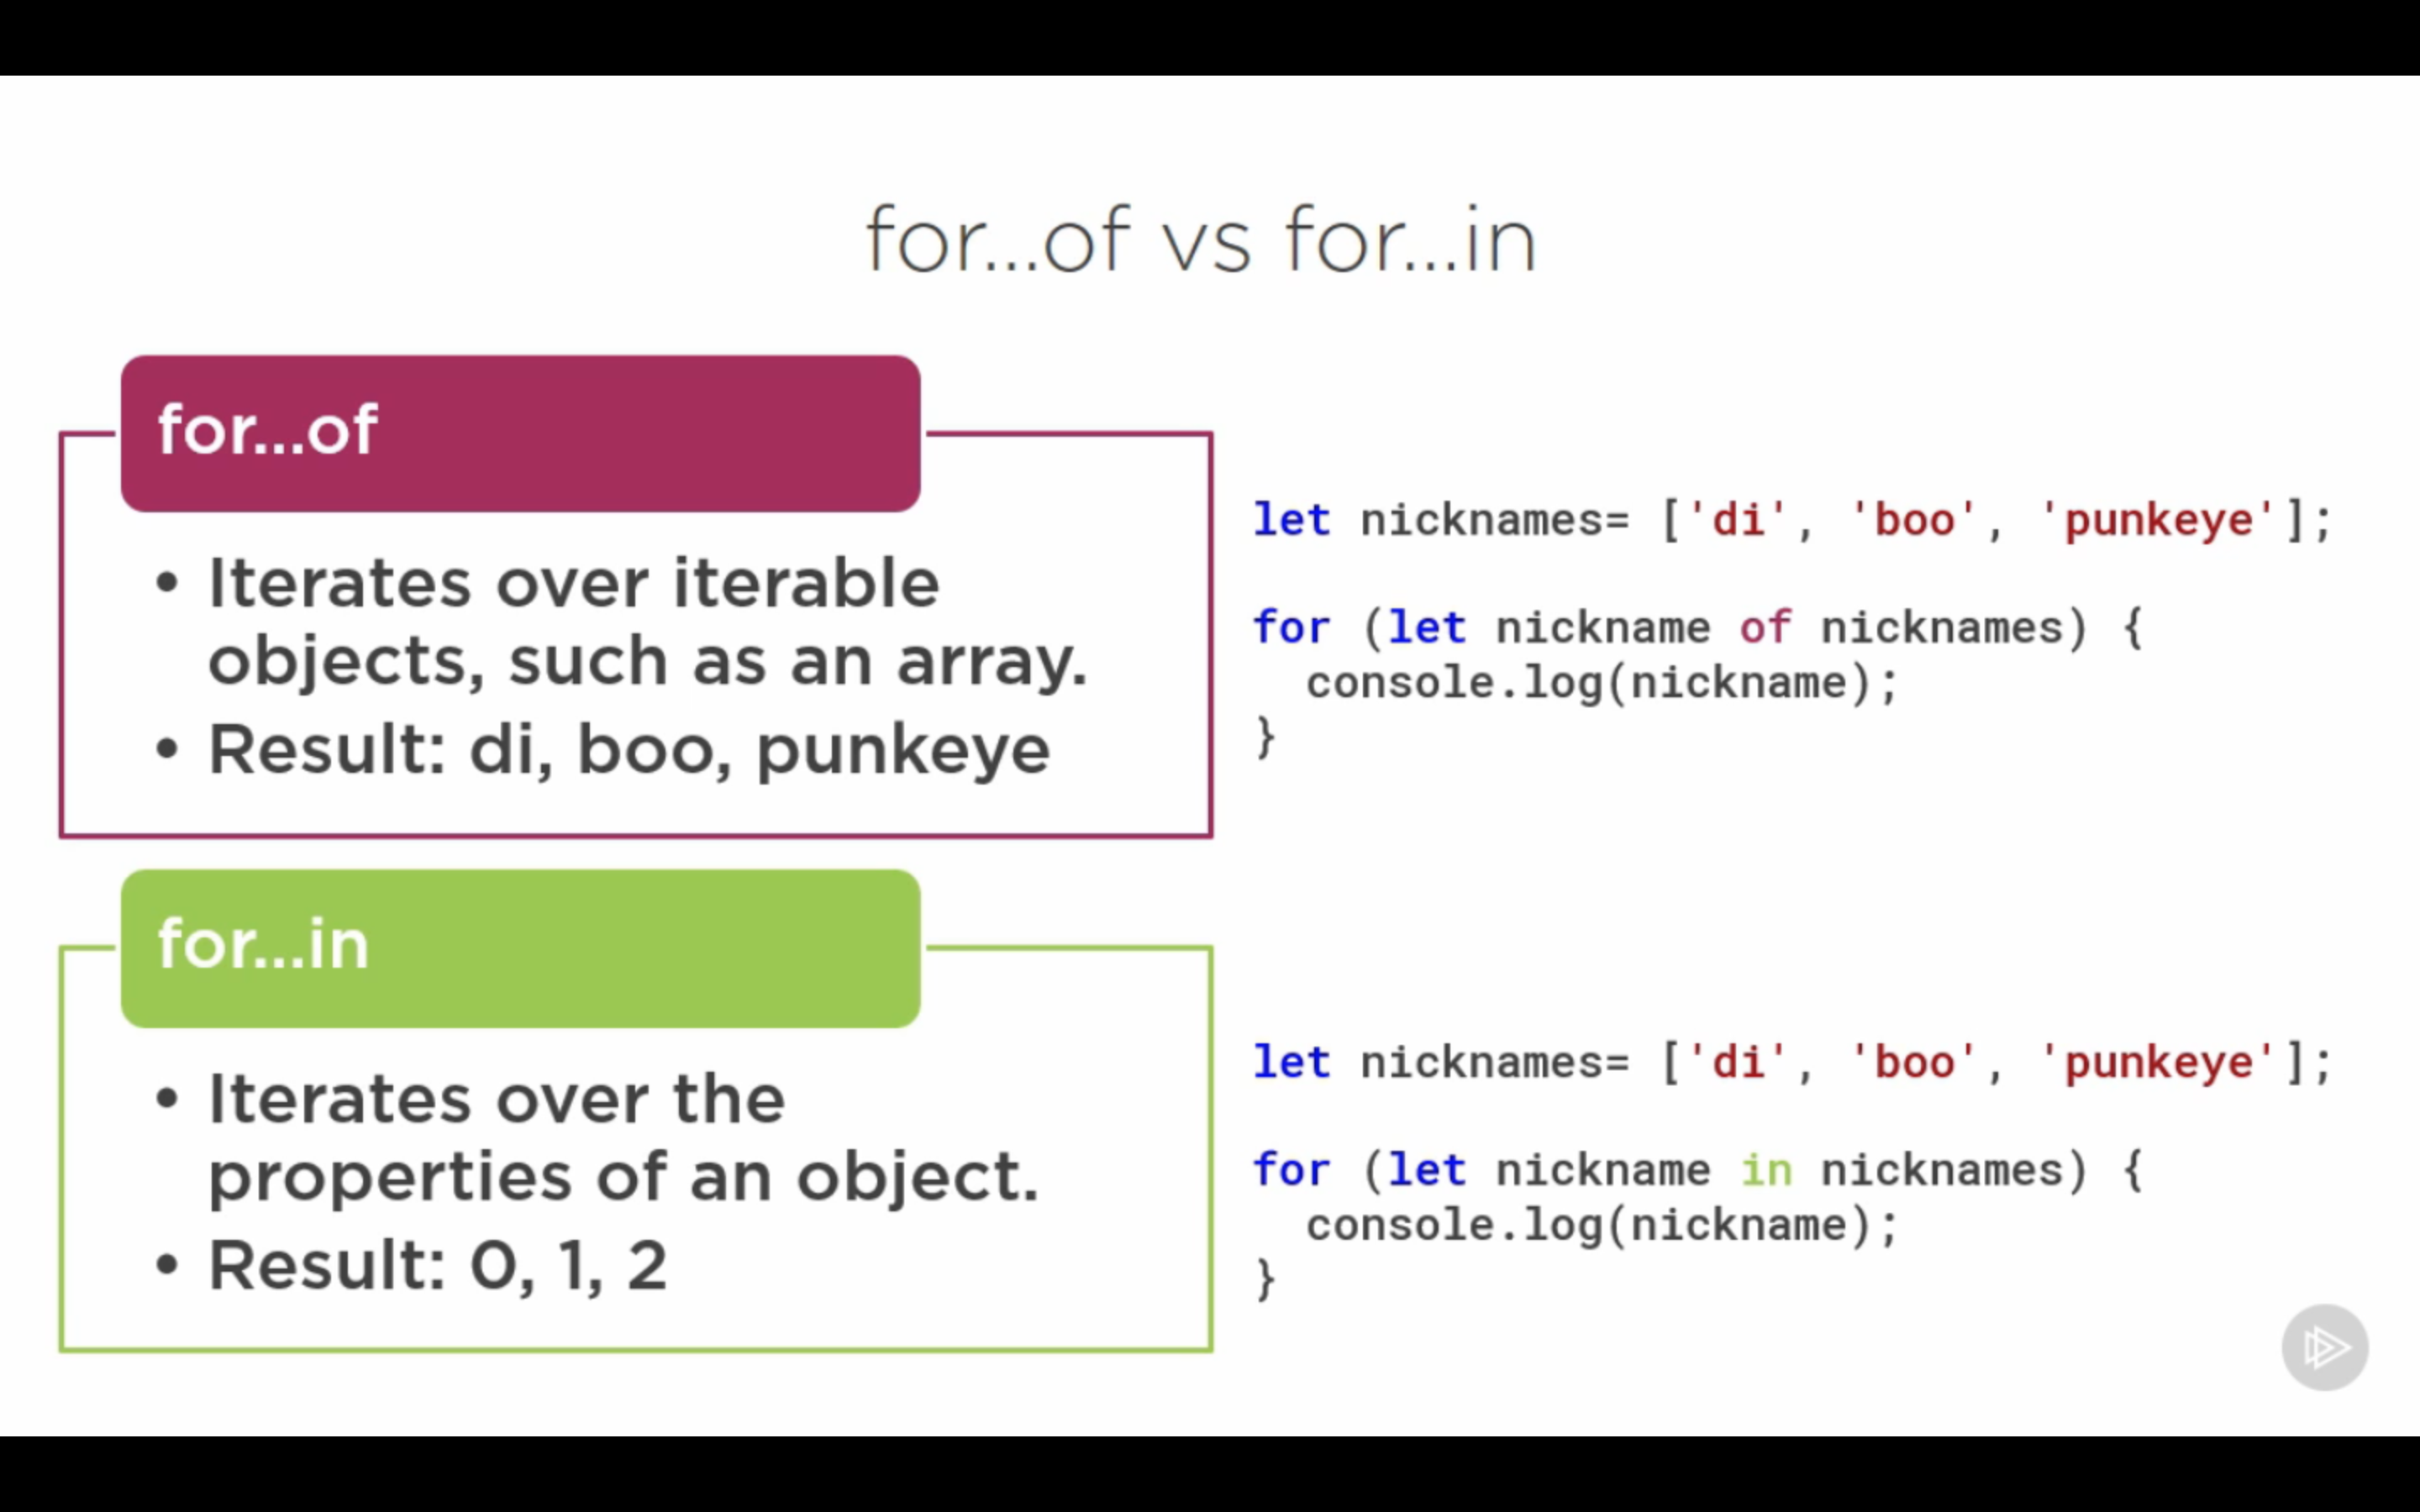
For of Vs. For in
-
Nested Component
-
@Input() variablename: variabletype;, so the parent component can using this prop by prop binding -
@Output()must be an event. eg: ` @Output() ratingClicked : EventEmitter= new EventEmitter();`. -
Generics: allow us to identify a specific type that the object instance will work with
-
Use Event binding to respond to events from the nested component: use $event to access the event in nested component
-
-
Service
-
Register services with angular injector, which maintains a container of active services instances. Injector create and manage single class or singleton as required.
-
Register a provider: create ro return a server or the service class itself.
-
Define as part of metadata
-
Inject to component and its children
-
-
Angular create single class of this service, called singleton, and holds onto it.
-
Component needs service: class define the service as dependency, injector provides and injects into constructor.
constructor(private http:Http) { }(public, protect) -
Dependency Injection: a coding pattern in which a class receive the instances of objects it needs(called dependencies) from an external source rather than creating them itself
-
Steps: the same as we define component and custom pipt
-
Create the service class
-
Define the metadata with a decorator
-
import what we need
-
-
-
Service Checklist:
-
Include the angular2 http script
-
Register http_providers in appropriate location in the component hierarchy
-
Import RXjs to load all responsive extension feature, such as : map, operator
-
Define a dependency for http client service using a constructor parameter
-
Create a method for each http request
-
Call desired http method, pass in the url
-
Map http response to a json file
-
err handling
-
In class that need service: call subscribe method to subscribe the observable; provide a function to handle an emitted item; provide an error function

-
-
Routing
-
Configure router for component
-
Add router script
-
path: url path segment for route
-
name: route name, PascalCase
-
Component: reference to the component itself, not in
"", must be inported -
Set useAsDefault to true to use the default route
-
-
Register routing providers:
-
specify in directives array in component.ts
-
add RouterLink directive as an attribute( on clickable element, enclosed in square brackets)
-
RouteOutlet
-
Passing params:
{ path: "products/:id/:productName", component: ProductDetailComponent },//app.module.ts;<a [routerLink] = "['/products', product.productCode, product.productName]"></a>//product-list.component.html;const id = this.activatedRoute.snapshot.params["id"];////product-detail.component.html, remmber to import
-
-
-
Define options/actions
-
Tie router to
-
Active router based on user action, sometimes passing parameters
-
Activating router display a view
-
Angular session notes
-
in app.module.ts: decorator: @ngModule // if you want to create a module
-
in app.component.tx: component, we must specify the selector, we can have multiple css file
-
ng generate component products/product-list.component, cli creates all files needed and add products to app.module.tx
-
copy selector:
app-product-listfrom product-list.component.ts @Component, use this component in app.component.html as<app-product-list></app-product-list> -
npm install bootstrap, add path of bootstrap.min.css to configuration file, which is angular-cli.json, style
-
prop binding,
<img [src]="product.imageUrl" [title] = "product.productName"/> -
ngIf show image and hide
-
pipe symbol
-
create interface, the command are from github page : ng g interface interfacename. iproduct here set the type of all props
-
ngOnInit, lift cycle, undestroy, unchange,
-
put data in a service, then inject service into component: add provider in @Component
-
import, specify(last bullet point), inject as dependency in constructor
-
http, add this module in app.module.ts, import in service file
-
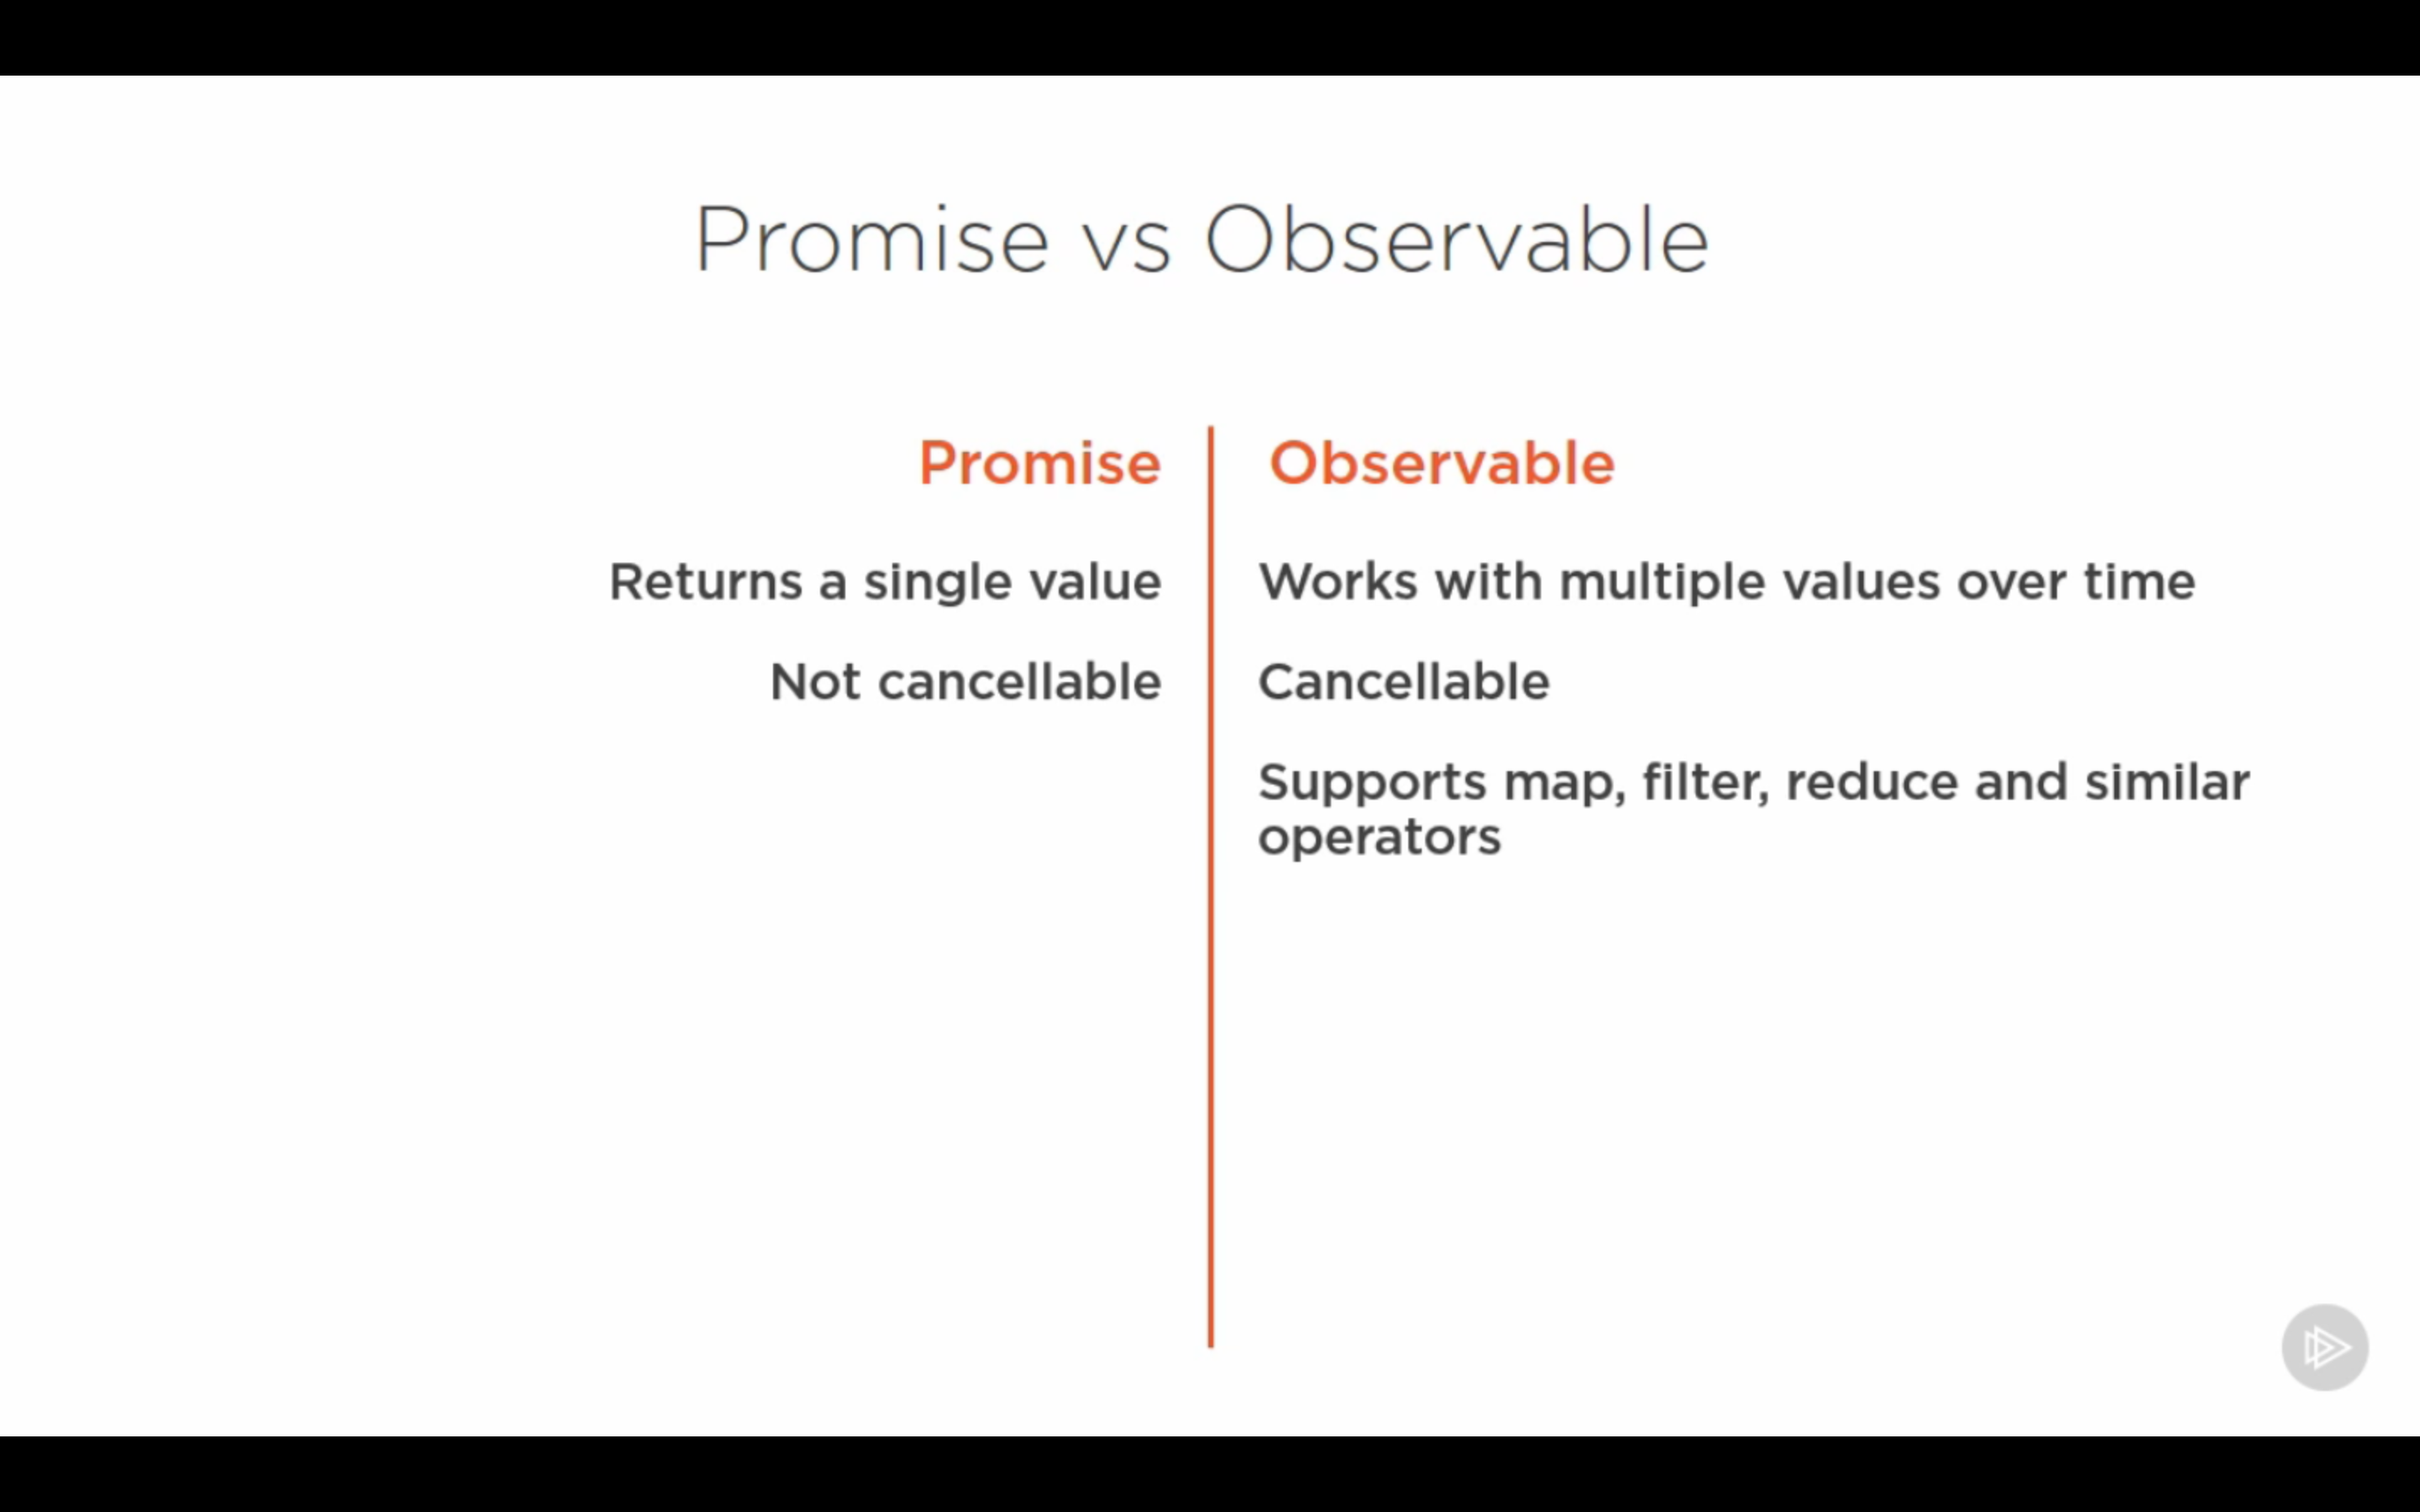
in angular1 get response using promise, same in angular2
-
import { Component, OnInit, Input} from '@angular/core';input, child component can use parent component’s data -
output, communication to parent
Comments